Hello, my crochet friends!
Let’s get to make this amazing and easy Crochet Crop Top Pattern together!
Well, this is also the Spider Top as I called it, You can guess which stitch combination we are going to use here!
Grab your hooks and here we start!
Find the free pattern below or purchase the ad-free PDF version of this pattern on Ravelry.
The PDF is designed for printing and this way you can support me!
It’s a great and easy pattern because:
- It is just two rectangles joined together
- You get to learn how to make this neckline that is so simple.
- You can modify the width and length just by adding rows and chains
- You are your model!
- You can use any type of yarn really- make it light with Dk or a winter vest with a Bulky

** Some of the links in this post may include affiliate links. Making a purchase through one of these links pays me a small referral fee at no added cost to you. These small fees add up and help me keep the blog running. View our Disclosure and Privacy Policy for more information.
Before you get started…
Check out my Favorite items and tools
Rechargeable LED night reading light on Amazon
Bamboo Hooks on Amazon
Colorful Bobby pins as crochet markers on Amazon
Pattern Designed By: Sandra Stitches This pattern is copyright protected; it is unlawful to distribute this pattern in any form (free, sale or trade).
The Spider Easy Crochet Crop Top Pattern

Let’s get to the Easy Crop Top Pattern, shall we?
Difficulty
- Beginners Friendly
Materials Used
- Yarn of any kind – I used Bravo Gizem 97% Acrylic 3% Viscose in shade 9239 , DK weight yarn
- 5mm hook, scissors, tapestry needle, stitch markers
Measurements
This Pattern is For Size M/L but you can adjust it easily by adding chains and rows- all explained in the pattern instructions
Stitches Used
ch = chain
sc = single crochet
Tr st = Treble stitch
st = stitches
sl st = slip stitch
Notes:
This Pattern is beginners friendly, it uses only basic stitches, of course, you have to be familiar with single crochet, double crochet, and slip stitch, if you are not, please visit here and here before starting this project
This Pattern is made with a multiple 9 + 3 and it is an 8 rows repeat.
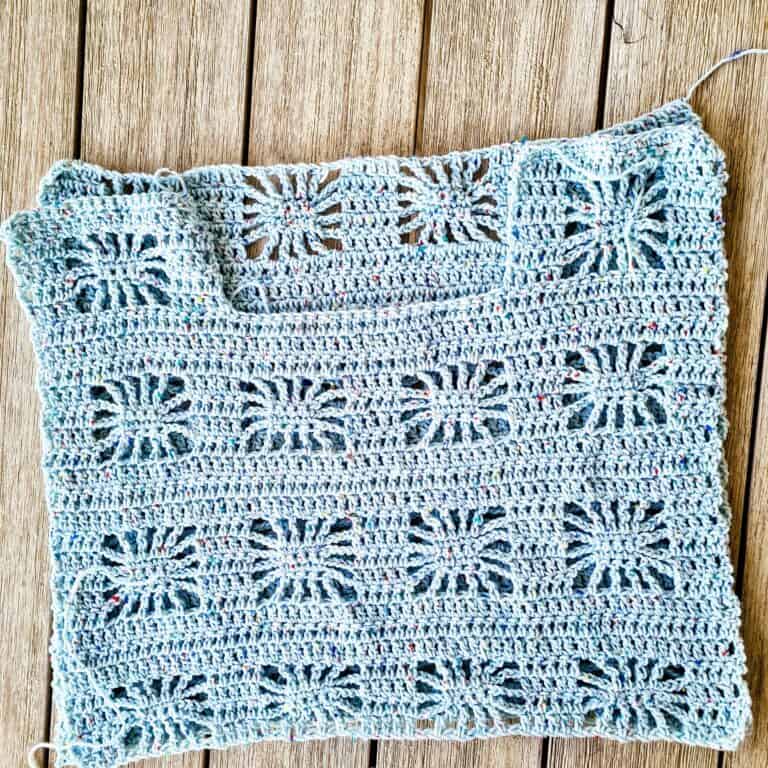
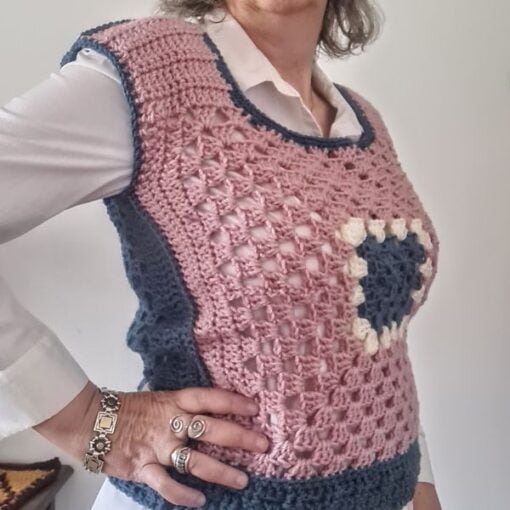
This Top is made from two rectangles joined together on the shoulders and sides.
The back panel is a full rectangle and the front panel has a square neck pattern- very easy to make.
Want to save this post for later? Pin it!
Instructions:
Back Panel
Foundation chain a multiple of 9 + 3, I chained 54 + 3
Now we start the Repeat Spider Pattern- I worked 4 times the pattern and it made a rectangle of 53 cm 21” wide. You can adjust to your desired size by adding chains in the multiple of 9 or reducing the multiple of 9.
Please make a gauge so you can be sure about your size.
R1: Dc in 4th ch from hook, dc in next 4 ch, ** ch4, sk1, 1tr in next ch, rep X3 (total of 4 tr), ch4, sk1, 1 dc in each 5 ch , rep** across to end and make sure you end with a set of 5 dc
R2: ch3 (counts as 1st dc and turn your work), dc in next 5 dc from prev row, ** ch4, 1 sc in each tr from prev row, ch 4, 1 dc in each dc from prev row, rep** across to end and make sure you end with a set of 5 dc
R3+ R4: repeat R2
R5: ch3 and turn work and 1dc in next 4 dc from prev row, **ch1, 1 tr on top of sc from prev row X3 (total of 4 tr) ch1, 1 dc on each dc from prev row (total of 5 dc) ** rep across to the end of row, make sure to end with a set of 5 dc.
R6: ch3 (counts as 1st dc) and turn your work, dc in next 5 dc from prev row ** 1dc in ch space , 1 dc on top of each tr from prev row, 1dc in ch space , 1dc on 5 next dc from prev row ** rep across to end of row- now you should have a row of dc’s counting 55
R7-8: ch3 (counts as 1st dc and turn your work,) dc in every st from prev row to end.
This is the Spider Pattern- you will repeat it from R1-8 as many times you wish your top length (height) to be, in my case, I worked 4 repeats ending with 3 rows of dc’s to a total height of 43cm 17”
When you finish this panel- secure your work and cut the yarn.
Let’s move to the Front panel ⬇️
Free ways to share and support me
- Favorite this pattern on Ravelry
- PIN on Pinterest
- Share in your story on Instagram
- Share on Facebook
Thank you so much! 🙂
.
Get your Ad-Free version on Ravelry
Click Here to share your finished project in our community!
Front Panel
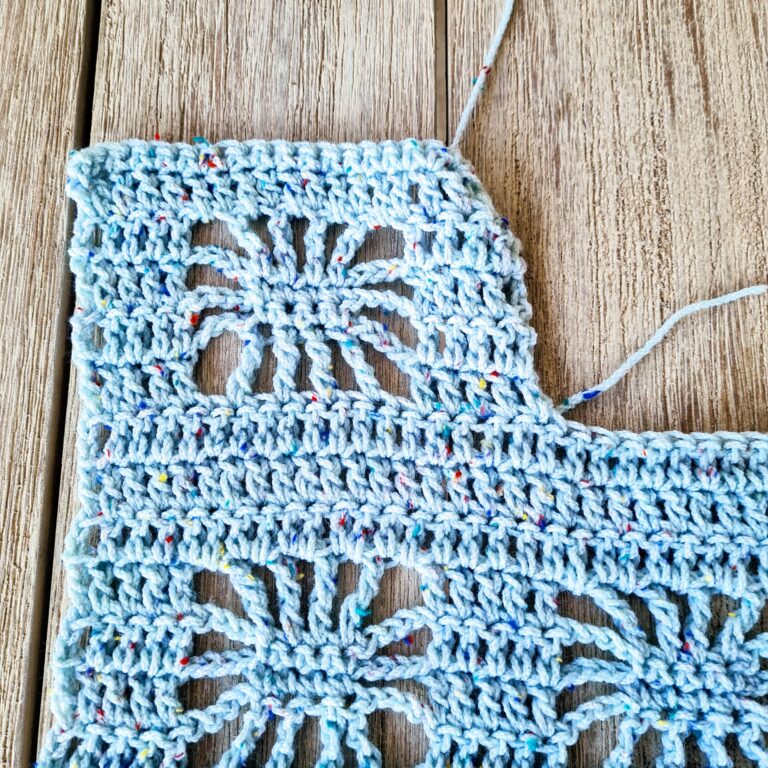
The front panel is made exactly like the back panel- but instead of 4 repeats of the spider pattern, stop at the third and continue as follows:
Make one time the spider pattern on each side of the rectangle to create shoulders and a square neck- shown in the photo. finishing with 3 rows of dc’s.
The height of both panels should be exactly the same.
Construction
Use the tapestry needle to join the shoulders: back and front first spider pattern on both sides.
Use again the tapestry needle to join the sides of the top leaving two spider patterns from the shoulder down for the arm holes on both sides.
This is it!!!
Interested in a professional Paperback Crochet Planner?
Check out my Planner on Amazon
Before you leave 🙂
Did you try this pattern?
Share a picture
Tag me on Instagram
@sandrastitchesil
Questions?
Ask and share in our
FREE Facebook Group
Want to know more about me? This is my story
DISCLOSURE
AMAZON ASSOCIATES: Sandra Stitches is a participant in the Amazon Services LLC Associates Program, an affiliate advertising program designed to provide a means for sites to earn advertising fees by advertising and linking to Amazon.com.
This post contains links to products that I use and recommend, If you purchase any using my links I get a very small fee at no ad to you! Thank you for supporting my small biz!

7 thoughts on “Easy Crochet Crop Top Pattern – The Spider Top”