
I go to the shuk more than I probably need to. Pots, plants, a bag of tomatoes I didn’t plan on, sometimes tiles I really didn’t need.
And every time I’m walking back with my arms full, I think the same thing. I should just make myself a proper bag for this.
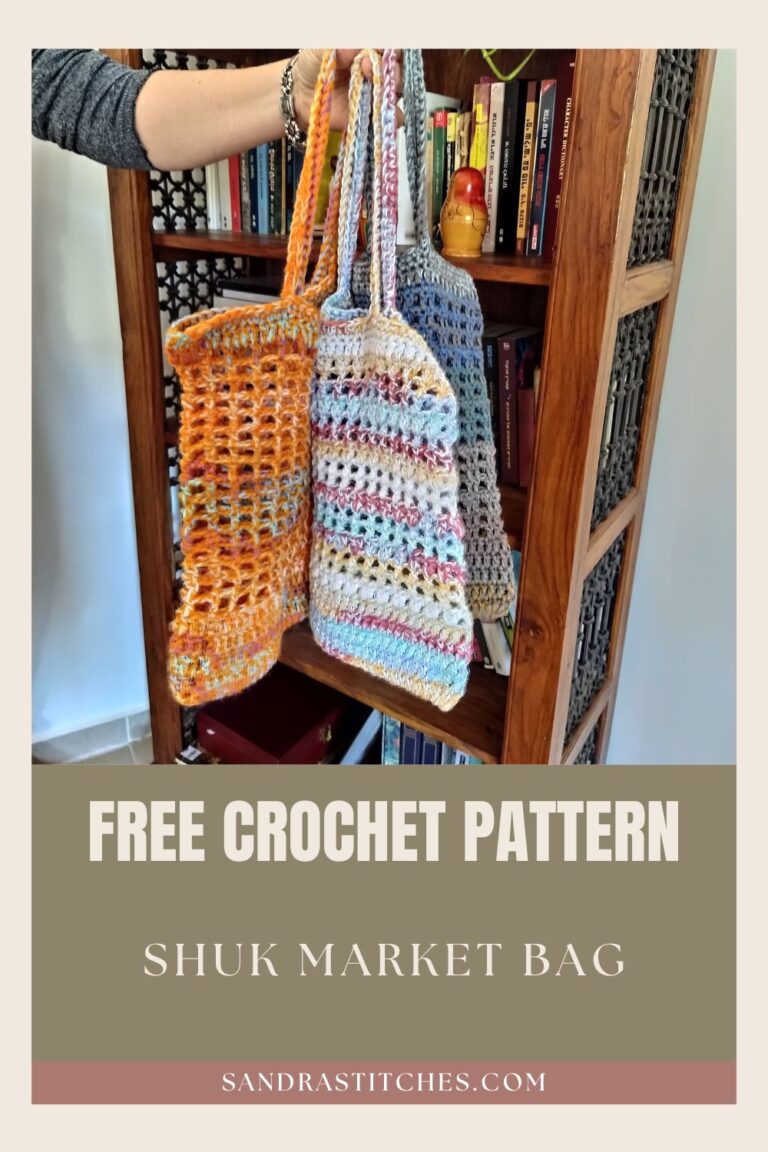
So I did. This is the Shuk Market Bag, a sturdy cotton crochet bag with room for a real shop, not just a loaf of bread and a lemon. It works up in an afternoon, and you get to pick from three different stitch options for the body, so it never has to look the same way twice.
Quick answer: This crochet market bag pattern uses sturdy cotton yarn, a simple double crochet base, and one of three stitch options for the body. It’s beginner friendly, worked in rounds, and takes about 250 to 350 yards of yarn.
How to Get the Ad-free PDF of this Design
Love to crochet without the scrolling? The complete Shk Market Bags pattern is available as a clean, printable PDF you can take anywhere. No ads, no popups, just the pattern, the photos, and plenty of room for your notes. Grab your PDF
The full written pattern is also right here on this page, free, a little further down. Both are the same tested pattern. The PDF simply travels better
Save this Shuk Bag Pattern for later
Not ready to start tonight? Pin it so it is waiting for you when you are.
What Yarn Works Best for a Market Bag
Cotton. It’s not exciting advice, but it’s the right one. A bag that’s going to carry vegetables, jars, and whatever else you pick up needs yarn with some backbone, and cotton holds its shape and washes easily when something inevitably leaks.
If you want a little more softness in the drape, a cotton acrylic blend works too. I used two strands held together, one acrylic and one cotton, which gave the bag enough structure to stand on its own but still feel good to carry.
Some links below are affiliate links. If you buy through them, I earn a small fee at no extra cost to you. It helps keep this blog running. Full disclosure here.
Yarn options at discount prices:
How Much Yarn Do You Need
Around 250 to 350 yards, depending on your stitch choice and how big you make the bag. Option 3 (the more solid stitch) tends to use a bit more than the two lacier options.
If you want a smaller version for just a few things, herbs or a couple of lemons, I also have a Market Tote Bag that works up even faster.
What You’ll Need
Notions: Yarn needle, scissors, measuring tape
Yarn: Any #4 weight cotton yarn, or a DK acrylic and thin cotton held together, about 300 yards
Hook: US Size H-8 (5mm)
Sandra’s tip: Before you decide which of the three stitch options to use, make a small swatch of each. They use the same base but look completely different once you’re a few rounds in, open and lacy versus solid and structured. I still go back and forth depending on what I’m planning to carry in it
The Shuk Market Bag Pattern
One more last thing 🙂
Hey there, before we get started on this awesome crochet market bag pattern, I wanted to point out that you have the option to choose from three different stitch combinations for the body of your bag.
What does that mean? It means you can choose to work with one, two, or all three stitch combinations to create a whole collection of unique bags!
So get ready to flex those crochet skills and make your own one-of-a-kind market bag.
Difficulty
Beginner
Materials
Any Weight #4 Cotton Yarn, or a combination of Dk Acrylic yarn with Thin Cotton yarn around 300 yards
I used two strands held together of Acrylic + Cotton yarn
Hook: US Size H-8(5 mm)
- Yarn Needle, Scissors, Measuring Tape
Sizes
13″ long X 13″ wide
Stitch Key
- Ch = Chain
- Sc = Single Crochet
- St = Stitch
- DC = Double Crochet
- Sl st = Slip stitch
Notes
- This pattern has three different options of stitch combinations for the body of the bag
- It is worked in rounds
- I used two strands held together
- Ch3 at the beginning of the row does count as 1st stitch
- Ch1 at the beginning of the row does not count as a stitch
- You can work this pattern with one color or multiple as you wish
- If changing colors make sure to have a changing technique and weave your ends in.
Instructions
The base of the three options is worked exactly the same
Chain 40+3
Round 1: Dc1 in 4th Ch from hook, Dc5 in the same spot for a total of 6 Dc (Ch3 counts as st), Dc1 in next Ch and across to last Ch, Dc 5 more in last Ch for a total of 6Dc, Dc1 in next spot on the base of the Dc, Dc1 in next and continue to end of the round’ Slst to Ch3 from the beginning. (86 st)
Round 2: Ch3, Dc1 in next st, Dc1 in next and around to the end of the round, Sl st to the Ch3 from the beginning
Row 3-5: Repeat Round2
This is the base of the Bag
Now we will work on the body, there are three different options of pattern repeats you can choose from. Each one forms a different Bag, make each one separately

Option #1
Round 6-16: Ch4 (counts as Dc+cH1), *[Skip 1 St, Dc1 in next st]* repeat from *to* around to the end of the round, Sl st to Ch3
Option #2
Rounds 6: Ch4 (counts as Dc+cH1), *[Skip 1 St, Dc1 in next st, Dc1 in next st]* repeat from *to* around to the end of the round, Sl st to Ch3
Round 7: Ch1, Sc1 in 1st st from hook, Sc1 in next st, Sc1 in next and in every st across to end of row
Repeat Round 6+7 for a total of five times
Make sure to finish with an Sc row- the # of rows really does not matter it is the height of the bag
Option #3
Rounds 6: Ch3, skip next st, Dc2 in next st, *[skip next st, Dc2 in next st]* repeat from *to* around to end of the round, finish with Dc in the Ch3 beginning.
Round 7-16: Ch3, Dc2 in between Dc2 from prev round, Dc2 in-between next and around to the end of the round, Dc1 in the same spot of Ch3 from the beginning, and Sl st to Ch3.

Finishing
These instructions apply to all three options
Round 17: Ch3, Dc1 in next st, Dc1 in next, and around to the end of the round. Slst to Ch3
Round 18: Ch1, Sc1 in next st, Sc1 in next, and around to the end of the round. Slst to 1st Sc
Lay your work flat and count 25 st around the corner and mark, count 20 st and mark, count again 25 and 20 and mark. Here we will work the straps.
Now you will have 4 stitch markers positioned where the straps (handles) will be.
Round 19: Ch1, Sc1 in 1st st from hook, Sc1 in next st and until you reach the 1st mark, Ch51, Sc1 in 2nd Ch from hook back all your 50 chain, Sc1 in next st and around until you reach the next mark, grab your Sc chain and Sl st to the next Sc1, continue to the next mark and repeat process to work your two handles
Secure your yarn, weave in ends and cut!
Congratulations! You made it! 😍
You Made It. Now Go Fill It.
That’s the whole bag. Mine’s already been to the shuk twice this week, once for vegetables, once for nothing but a very large bag of tiles I still haven’t used.
If you’d like a second bag for smaller trips, my Easy Mesh Market Bag is a lighter, quicker option worth having alongside this one.
Copyright protected. You may not redistribute pattern after purchase or publish any part as your own including photos. If sharing online you must link back to this original post. You may sell finished products and if possible, reference back to this pattern and/or give credit to Sandra Stitches by Sandra as the original designer.
FAQ
How big is the finished bag?
13 inches long by 13 inches wide, before you fill it and it stretches with the weight.
Can I use a different yarn weight?
You can, but cotton at a #4 weight is what gives this bag the strength to actually carry groceries. A lighter yarn will work up looser and won’t hold shape the same way.
Which of the three stitch options is easiest?
Option 1 is the simplest, an open mesh style stitch repeated straight through. Option 3 is the most solid and takes a little more patience.
How much yarn do I actually need?
Around 250 to 350 yards, depending which stitch option you pick and how tall you make the body.
Did you make one? Share a picture and tag me on Instagram @sandrastitchesil — I’d love to see which stitch option you picked.
A quiet place to keep crocheting
If projects like this one are your kind of calm, you might love the V-Stitch Club.
It is my little corner of the internet for women who crochet for the joy and the quiet of it, with new patterns, gentle company, and the steady rhythm of always having something beautiful on the hook.
Be Part of The Tribe!
Come share your finished Ridgeline Beanie in my free Facebook group. Join Crochet & Stories with Sandra Stitches.
DISCLOSURE
AMAZON ASSOCIATES: Sandra Stitches is a participant in the Amazon Services LLC Associates Program, an affiliate advertising program designed to provide a means for sites to earn advertising fees by advertising and linking to Amazon.com.
This post contains links to products that I use and recommend, If you purchase any using my links I get a very small fee at no ad to you! Thank you for supporting my small biz!

Hi my crochet friend!
Crochet has followed me from Argentina to Israel and through every crossroads since. Now I design calm, achievable crochet, made to feel possible.
Come find free patterns, tutorials, and the V-Stitch Club right here on the blog.



3 thoughts on “Crochet Market Bag Pattern, Quick to Make for Market Day”
This is a great project to make! Especially now that plastic bags are getting so much more difficult to find here in Ontario. This crochet market bag would be so easy to pop in the glove box in the car so there is always one on hand. Thank you for linking up at our weekly Link Party! You are being featured at our Wednesday
Party #500 this week. Here’s the direct link to the post in case you’d like to share your feature:
https://oombawkadesigncrochet.com/market-bag-rainbow-gift-bag-ceramic-air-plant-holder-link-party-500/
Hope to see you again next week! Rhondda
Thank you Rhonda for featuring this pattern!