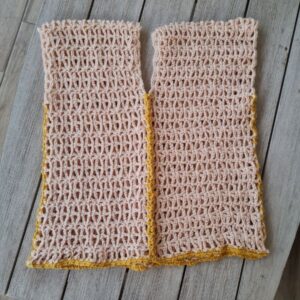
Lacy Crochet Vest pattern – Apricot is a super easy two rectangles crochet project.
When you need a new and repetitive design and want a crochet vest you can wear at any season.
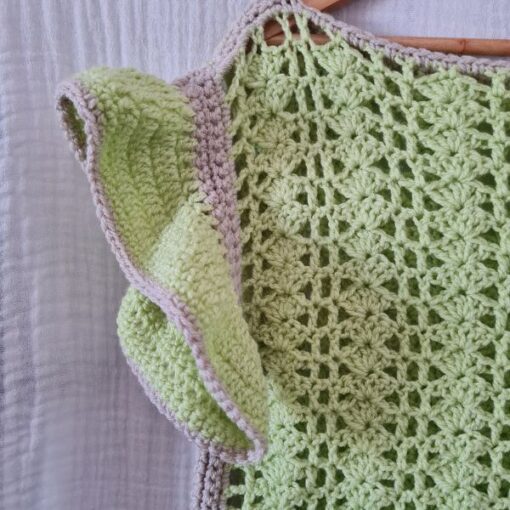
I used for this sample acrylic yarn, but I can see it in cotton yar as a beach top as well.
Are you with me?
There are 2  ways to get this pattern:

Option 1: You can purchase the individual pattern as an easy-to-read,ad-free, print-friendly PDF  from Ravelry

Option 2: Scroll down to get the written instructions for this pattern for free
Want to save this post for later? Go Ahead and Pin it! 👇

What size will your Crochet lacy vest be?
Vests are more of a loose wearable in most times so if you need to take a look at measurements please use this chart


You will find instructions in the free pattern below ⬇️
** Some of the links in this post may include affiliate links. Purchasing one of these links pays me a small referral fee at no added cost to you. These small fees add up and help me keep the blog running. View our Disclosure and Privacy Policy for more information.
Before you get started, check out my Favorite Crochet Tools (affiliate)
Yarn Winder – a perfect crochet accessories
Neck Stretcher – to keep you without neck and back pain
Gauge Ruler – so you always get the right size
Pattern Designed By: Sandra Stitches This pattern is copyright protected; it is unlawful to distribute this pattern in any form (free, sale or trade).
▶️ Add this pattern to your Ravelry favorites here
Let’s get to the pattern, shall we? Making a lacy crochet vest

Materials
Alize Burcum KlassiK, 100gr, 100% Acrylic, 210 mt, 230 yards color 491
For this sample, I used 2 skeins
Hook: US Size H-8 (5 mm)
Yarn Needle, Scissors, Measuring Tape
Gauge
- 13 st X 9 rows
Sizes
This sample is: 22” in height and 21” wide, Size M/L for Women
Stitch Key
- Ch = Chain
- Sc = Single Crochet
- Dc = Double Crochet
- Hdc = Half Double Crochet
- Tr = Treble Crochet
- St = Stitch
Notes
- This pattern is written in US terms
- The pattern is worked in horizontal rows
- This pattern is worked in separate parts and joined together, two exact panels joined on the sides, front, and back
- Ch1 at the beginning of the row does not count as st
- This pattern uses pattern repeats.
- You can work this pattern with one color or multiple as you wish- I used one solid color for the main part and an accent color for the joining stitches
- If changing colors make sure to have a changing technique and weave your ends in.
- You can decide on the width and length of the Vest by adding multiples of chains at the foundation and row repeats
- Measure yourself to know your size and calculate the number of stitches according to your gauge
- If you need help with this task consider this workshop
- This pattern calls for chain multiples of 6
Instructions
Panel – make two identical
Ch 138
Row 1: Sc in 9th Ch from hook, Ch3, skip next 2 Ch, Dc1 in next Ch, *[Ch3, skip next 2 Ch, Sc1 in next Ch, Ch3, Skip next 2 Ch, Dc1 in next Ch]* Repeat from *to* across to end of the chain, turn work
Row 2: Ch1 Sc1 in 1st Dc, *[ Ch2, (Dc+Ch1+Dc) in next Sc, Ch2, Sc1 in next Dc}* repeat from *to* , end with last Sc in 3rd Ch of turning Ch.turn work
Row 3: Ch6, (counts as Dc+Ch3), skip next Ch2 space, Sc1 in next Ch1 space, Ch3, skip next Ch2 space, Dc1 in next Sc, *[ Ch3, skip next Ch2 space, Sc1 in next Ch1 space, Ch3, skip next Ch2 space, Dc1 in next Sc]* repeat from *to* across, end with last Dc in 3rd Ch of turning Ch, turn work
Rows 2-3 are the repeat pattern for this entire Vest
I made 10 repeats for every panel.
Make sure you have the measure you need for the width of the vest, adding rows will make it wider, and adding chains will make it longer.
Do you want to save this post for later? Pin it!

Joining
Fold both panels in half, right side facing you,
Measure 9” from the top down on the joining part of the panels to mark the neck hole.
Use stitch markers on both panels to mark. Make sure both panels are straight and calculate the height.
This will also be the height for the armholes. So mark them on both sides.
Using a different color of yarn (optional)
Introduce the yarn to the 1st st top-down of any joining part, *[Sc1 in the 1st st of one p[anel, Sc1 in the same st on the second panel, Ch1, Sc1 on Ch space, Sc1 of first panel and Sc1 on Ch space of 2nd panel, Ch1]* repeat from *to* to the end, secure yarn and cut
Repeat on all 4 joining parts, two sides, front and back.
Finishing
Cut your yarn and weave in the ends.
Did you try this Pattern? Share a picture
Tag me on Instagram
@sandrastitchesil
Want more Top patterns?
DISCLOSURE
AMAZON ASSOCIATES: Sandra Stitches is a participant in the Amazon Services LLC Associates Program, an affiliate advertising program designed to provide a means for sites to earn advertising fees by advertising and linking to Amazon.com.
This post contains links to products that I use and recommend, If you purchase any using my links I get a very small fee at no ad to you! Thank you for supporting my small biz!
**This is an original Sandra Regev pattern: Owner /Designer of Sandra Stitches. This pattern may not be redistributed for free, sale, or trade, but finished products can be sold with credit to this shop – enjoy!