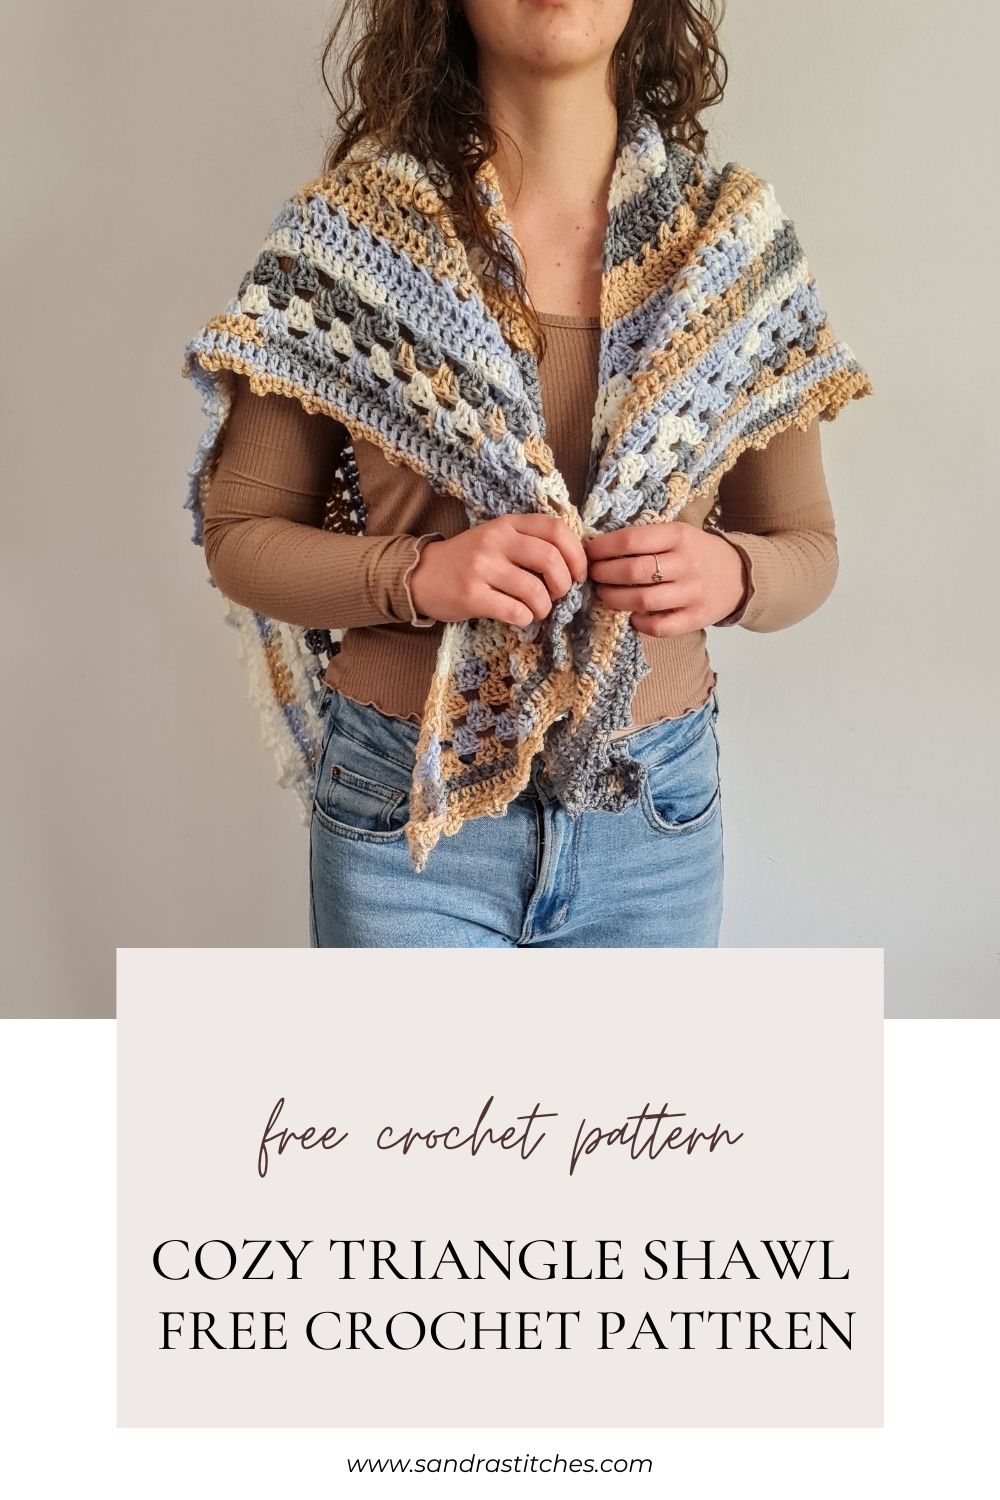
Are you a triangle crochet shawl girl? You know those super cozy shawls you can put over your shoulders in cold days and feel wrapped in coziness?
Well I am, and I love having one for different occasions or color outfits!
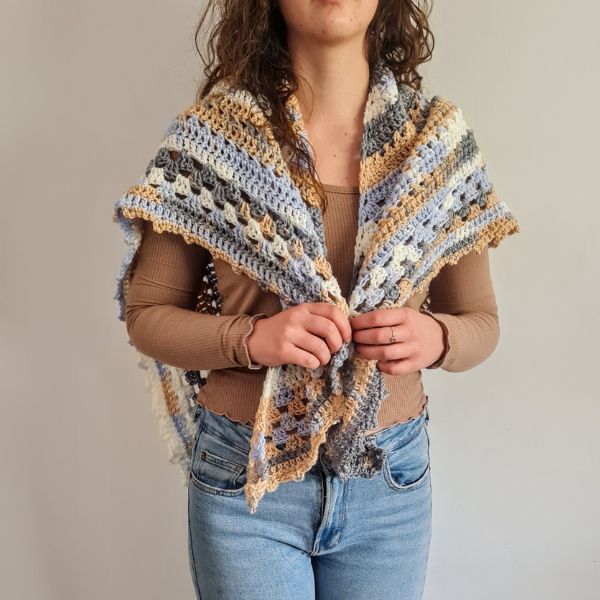
This triangle crochet shawl pattern is one of my favorites when I think of colors.
Well, I think no words are needed! look at the amazing colorway of the variegated yarn. The blues, the greens, and beiges immediately reminded me of our amazing trip to Scandinavia a few years back!
The blue skies, the green mountains, the snow and rivers, the icebergs, and all the extraordinary nature all in this triangle crochet shawl.
Are you with me?
There are 2  ways to get this pattern:

Option 1: You can purchase the individual pattern as an easy-to-read, print-friendly PDF  from Ravelry

Option 2: Scroll down to get the written instructions for this pattern for free
What is a good size for a triangle crochet shawl?
A recommended size for a triangle shawl typically begins at 60 inches wide by 30 inches tall.
Many patterns provide stitch repeat instructions, allowing for adjustments to create an oversized or smaller shawl as desired. I
n this pattern, the showcased shawl measures approximately 68 inches (173 cm) wide by 32 inches (81 cm) tall, with sides extending to 49.5 inches (126 cm).
** Some of the links in this post may include affiliate links. Making a purchase through one of these links pays me a small referral fee at no added cost to you. These small fees add up and help me keep the blog running. View our Disclosure and Privacy Policy for more information.
Before you get started, check out my Favorite Crochet Tools (affiliate)
Yarn Winder – a perfect crochet accessories
Neck Stretcher – to keep you without neck and back pain
Gauge Ruler – so you always get the right size
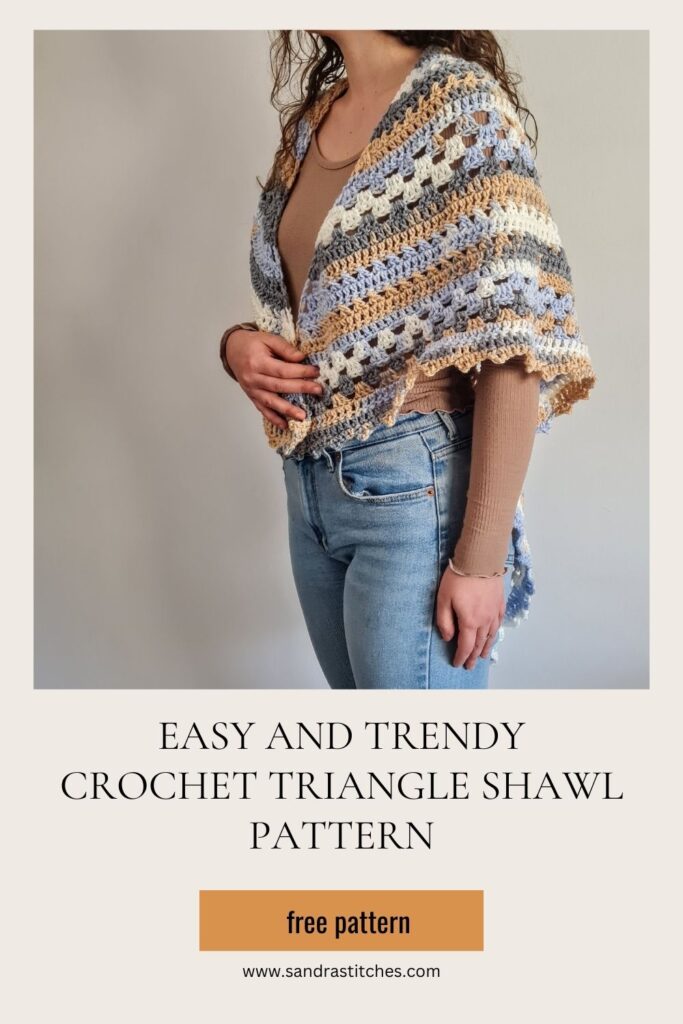
How do you drape a triangle crochet shawl?
To drape a triangle crochet shawl, start by holding the shawl with the point facing downward. Then, drape the longest side over your shoulders, allowing the two shorter sides to fall naturally down your arms.
You can adjust the drape to your preference, whether you prefer a more relaxed look or a snug fit around your shoulders.
Experiment with different draping styles to find the one that complements your outfit and comfort level best.
Pattern Designed By: Sandra Stitches This pattern is copyright protected; it is unlawful to distribute this pattern in any form (free, sale or trade).
▶️ Add this pattern to your Ravelry favorites here.
Let’s get to the pattern, shall we? Making fingerless gloves free pattern
Difficulty

Materials
Bebe Batik Alize Burcum Yarn, 100% Acrylic, 100gr, 210m, 230yds
3.5 skeins
Subs can be
Mary Maxim: Baby Blankie
Herrshners: Worsted 8
Bernat: Super Value

Hook: US Size J-10 (6 mm)
Yarn Needle, Scissors, Measuring Tape
Sizes
- Can be modified as you wish by adding or subtracting rows. This sample is: 36” in height X 50” in width
Stitch Key
- Ch = Chain
- Sc = Single Crochet
- St = Stitch
- Dc = Double Crochet
- Yo = Yarn over
- Slst = Slip stitch
Specialty Stitch
X st = (Yo, Skip 1 st, Dc1 in next st, Yo, Dc1 in skipped st to form a cross X shape)
Notes
- The pattern is worked in rows
- Ch1 does not count as St at the beginning of each row
- This pattern uses pattern repeats.
- You can work this pattern with one color or multiple as you wish- I used a variegated yarn
- If changing colors make sure to have a changing technique and weave your ends in.
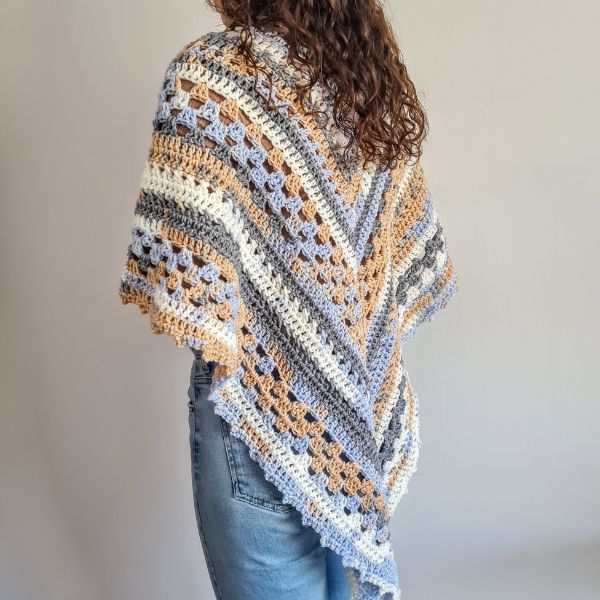
- As a triangle shawl, there is a middle and both sides are identical
Instructions
Chain 3 and Slst to 1st Ch to form a circle or use the magic circle
Row 1:Ch1, Dc1, Ch1, (Dc3, Ch3, Dc3) this is going to be the center of the shawl, , Ch1, Dc1 all inside the circle we formed, turn work
Row 2: Ch1, Dc1 in 1st st from hook, Ch1, Dc3 in Ch1 space from prev row, Ch1, skip 3 Dc, (Dc3 + Ch3+Dc3 in Ch3 space from prev row ) this is the center, Ch1, Dc3 in Ch1 space from prev row, Ch1, Dc1 in last Dc from prev row, turn ( 4 sets of 3 Dc)
Row 3: Ch1, Dc1 in 1st st from hook, Ch1, Dc3 in Ch1 space from prev row, Ch1, skip 3 Dc, Dc3 in next Ch1 space form prev row, (Dc3 + Ch3+Dc3 in Ch3 space from prev row ), this is the center, Ch1, Dc3 in Ch1 space from prev row, Ch1, Dc3 in next Ch1 space, Ch1, Dc1 in last Dc from prev row, turn
Let’s continue to grow this shawl
Row 4: Ch1, Dc1 in 1st st from hook, Ch1, Dc3 in Ch1 space from prev row, Ch1, skip 3 Dc, Dc3 in next Ch1 space form prev row,Ch1, Dc3 in next Ch1 space (Dc3 + Ch3+Dc3 in Ch3 space from prev row ), this is the center, Ch1, Dc3 in Ch1 space from prev row, Ch1, Dc3 in next Ch1 space, Ch1, Dc3 in next Ch1 space, Ch1, Dc1 in last Dc from prev row, turn
Row 5: Ch1, Dc1 in 1st st from hook, Ch1, Dc3 in Ch1 space from prev row, Ch1, skip 3 Dc, Dc3 in next Ch1 space form prev row, Ch1, Dc3 in next Ch1 space, Ch1, Dc3 in next Ch1 space, Ch1, (Dc3 + Ch3+Dc3 in Ch3 space from prev row ), this is the center, Ch1, Dc3 in Ch1 space from prev row, Ch1, Dc3 in next Ch1 space, Ch1, Dc3 in next Ch1 space, Ch1, Dc3 in next Ch1 space, Ch1, Dc1 in last Dc from prev row, turn
Row 6: Ch1, Dc1 in 1st st from hook, Ch1, Dc3 in Ch1 space from prev row, Ch1, skip 3 Dc, Dc3 in next Ch1 space form prev row, Ch1, Dc3 in next Ch1 space, Ch1, Dc3 in next Ch1 space, Ch1, Dc3 in next Ch1 space, Ch1, (Dc3 + Ch3+Dc3 in Ch3 space from prev row ), this is the center, Ch1, Dc3 in Ch1 space from prev row, Ch1, Dc3 in next Ch1 space, Ch1, Dc3 in next Ch1 space, Ch1, Dc3 in next Ch1 space, Ch1, Dc3 in next Ch1 space, Ch1, Dc1 in last Dc from prev row, turn
Want to save this post for later? Pin it!
The next rows
Row 7: Ch1, Dc1 in 1st st from hook, Ch1, Dc2 in Ch1 space from prev row, Dc1 in every st across to the center of shawl, (Dc3+Ch3+Dc3) in the center, Dc1 in every st to the last Ch1 space, Dc2 in ch1 space, Ch1, Dc1 in last Dc from the prev row, turn
Row 8: Ch1, Dc1 in 1st st, Ch1, Dc2 in Ch1 space from prev row, Xst in next 32 st forming 16 X stitches, Dc1 in last before the center of shawl, (dc3+Ch3+Dc3) in Ch3, Dc1 in next, Xst in next 32 st, Dc2 in last Ch1 space from prev row, Ch1, Dc1 in last st, turn
Row 9: Ch1, Dc1 in 1st st from hook, Ch1, Dc2 in Ch1 space from prev row, Dc1 in every st across to the center of shawl, (Dc3+Ch3+Dc3) in the center, Dc1 in every st to the last Ch1 space, Dc2 in ch1 space, Ch1, Dc1 in last Dc from the prev row, turn
Row 10: Ch1, Dc1 in 1st st, Ch1, Dc2 in Ch1 space from prev row, Xst in next 42 st forming 21 X stitches, Dc1 in last before the center of shawl, (dc3+Ch3+Dc3) in Ch3, Dc1 in next, Xst in next 42 st, Dc2 in last Ch1 space from prev row, Ch1, Dc1 in last st, turn
More rows to the triangle crochet shawl pattern
Row 11+12: Ch1, Dc1 in 1st st from hook, Ch1, Dc2 in Ch1 space from prev row, Dc1 in every st across to the center of shawl, (Dc3+Ch3+Dc3) in the center, Dc1 in every st to the last Ch1 space, Dc2 in ch1 space, Ch1, Dc1 in last Dc from the prev row, turn
Row 13: Ch1, Dc1 in 1st st from hook, Ch1, Dc3 in Ch1 space from prev row, Skip 3 st, Dc3 in next st, Skip3 st, Dc3 in next st, continue to last Dc before the center, skip that st, (Dc3 + Ch3 + Dc3) in Ch3 space, Skip 1 Dc, Dc3 in next st, skip 3 st, Dc3 in next and across to Ch1 space from prev row, Dc2 in Ch1 space, Ch1, Dc1 in last Dc, turn
Row 14-16: Repeat row 13
Row 17+18: repeat Rows 11+12
and the final rows are…
Row 19: Ch1, Dc1 in 1st st, Ch1, Dc2 in Ch1 space from prev row, Xst in next 84 st forming 42 X stitches, Dc1 in last before the center of shawl, (dc3+Ch3+Dc3) in Ch3, Dc1 in next, Xst in next 84 st, Dc2 in last Ch1 space from prev row, Ch1, Dc1 in last st, turn
Row 20: Ch1, Dc1 in 1st st from hook, Ch1, Dc2 in Ch1 space from prev row, Dc1 in every st across to the center of shawl, (Dc3+Ch3+Dc3) in the center, Dc1 in every st to the last Ch1 space, Dc2 in ch1 space, Ch1, Dc1 in last Dc from the prev row, turn
Row 21: Ch1, Dc1 in 1st st, Ch1, Dc2 in Ch1 space from prev row, Xst in next 94 st forming 47 X stitches, Dc1 in last before the center of shawl, (dc3+Ch3+Dc3) in Ch3, Dc1 in next, Xst in next 94 st, Dc2 in last Ch1 space from prev row, Ch1, Dc1 in last st, turn
Row 22+23: Ch1, Dc1 in 1st st from hook, Ch1, Dc2 in Ch1 space from prev row, Dc1 in every st across to the center of shawl, (Dc3+Ch3+Dc3) in the center, Dc1 in every st to the last Ch1 space, Dc2 in ch1 space, Ch1, Dc1 in last Dc from the prev row, turn
Ok, a few more…
Row 24+25+26: Ch1, Dc1 in 1st st from hook, Ch1, Dc3 in Ch1 space from prev row, Skip 3 st, Dc3 in next st, Skip3 st, Dc3 in next st, continue to last Dc before the center, skip that st, (Dc3 + Ch3 + Dc3) in Ch3 space, Skip 1 Dc, Dc3 in next st, skip 3 st, Dc3 in next and across to Ch1 space from prev row, Dc2 in Ch1 space, Ch1, Dc1 in last Dc, turn
Row 27+28: Ch1, Dc1 in 1st st from hook, Ch1, Dc2 in Ch1 space from prev row, Dc1 in every st across to the center of shawl, (Dc3+Ch3+Dc3) in the center, Dc1 in every st to the last Ch1 space, Dc2 in ch1 space, Ch1, Dc1 in last Dc from the prev row, turn
Row 29: finishing row – Ch3, Slst into 1st st from hook, Sc1 in next 3 stitches, Ch3, Slst in same st, Sc1 in next 3 Stitches, across to center of shawl, sc1 in last 4 st before the center, Sc1 in ch3 space, Ch3, Sc1 in same Ch3 space, Sc1 in next 4 st, Ch3, Slst in same st, Sc1 in next 3 st, and across to end of the shawl, Finish with Ch3 and Slst at last st.
Finishing
You can add more repeats to make a longer shawl
You can also add fringe or tassels
Cut your yarn and weave in the ends.
I recommend blocking the finished Shawl before wearing it!
Enjoy!
Want to save this post for later? Pin it!
Did you try this Pattern? Share a picture
Tag me on Instagram
@sandrastitchesil
Want more crochet Shawl patterns?
DISCLOSURE
AMAZON ASSOCIATES: Sandra Stitches is a participant in the Amazon Services LLC Associates Program, an affiliate advertising program designed to provide a means for sites to earn advertising fees by advertising and linking to Amazon.com.
This post contains links to products that I use and recommend, If you purchase any using my links I get a very small fee at no ad to you! Thank you for supporting my small biz!

