How to Crochet the Silt Stitch: A Step-by-Step Tutorial.
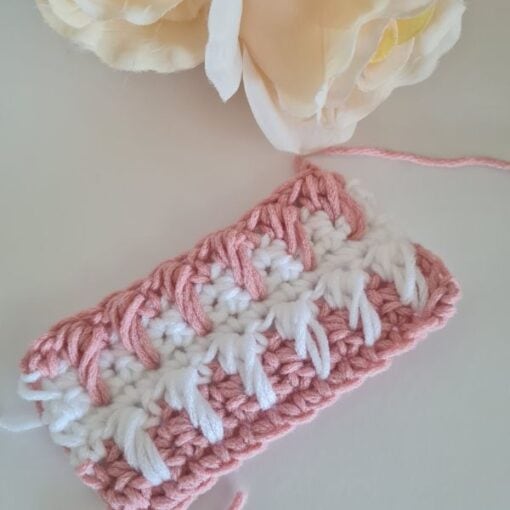
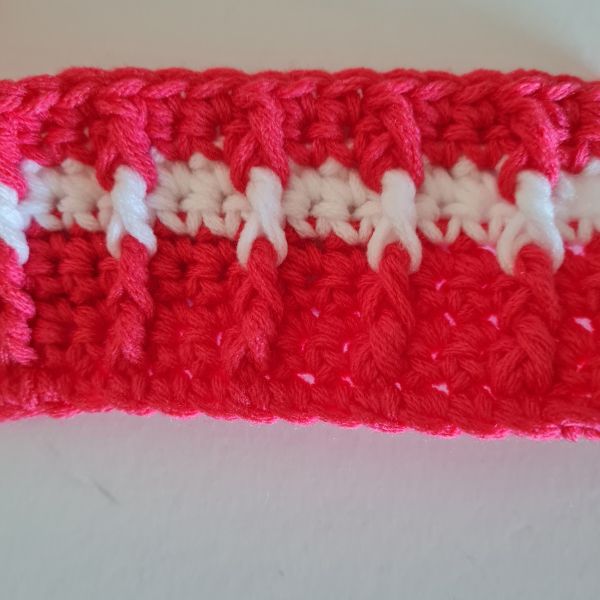
The Silt Stitch is a textured crochet pattern created by alternating rows of double crochet with rows of small clusters. It is an ideal stitch for bags, blankets, and wearables because it creates a dense, non-sagging fabric with a sophisticated diagonal look
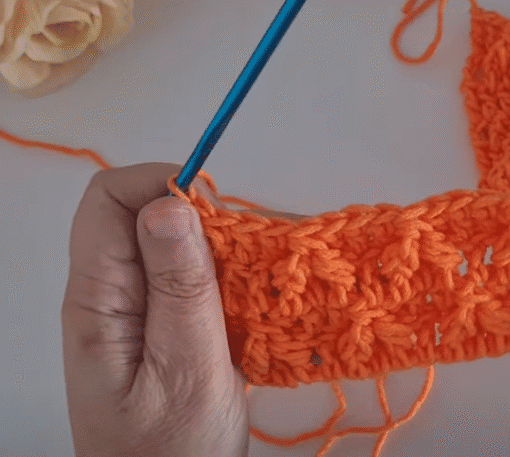
Watch the video below for a step-by-step tutorial
Be creative!
What is the Silt Stitch?
So, what exactly is the Silt Stitch? It’s a crochet stitch that combines basic stitches to create a textured fabric.
Think of it as a way to add some visual interest without complicated techniques. It is great for adding visual texture to anything you want to crochet.
You can use this stitch for lots of different projects. Silt Stitch works great in blankets because it adds a cozy feel.
It can also make scarves with a unique look. Because it’s so versatile, you can even use it for sweaters, bags, or even home decor items!
Sandra’s Pro Tip: I prefer using a slightly larger hook than the yarn recommends for the Silt Stitch if I’m making a garment, as it gives the clusters more ‘breathability’ while maintaining the shape.
Do you want to save this post for later? Pin it 👇

Materials You’ll Need
Before you start, you’ll need to gather a few materials. Here’s what I used, but feel free to adapt this to the yarn and hook you enjoy!
- Yarn: Weight 4 yarn
- Crochet Hook: 5 mm hook
- Scissors: To cut the yarn.
- Yarn Needle: For weaving in the ends.
Feel free to experiment with different yarn weights and hook sizes to get a different look!
If you’re ready, grab your materials, and let’s get crocheting!
** Some of the links in this post may include affiliate links. Making a purchase through one of these links pays me a small referral fee at no added cost to you. These small fees add up and help me keep the blog running. View our Disclosure and Privacy Policy for more information.
Stitch Abbreviations
To make things easier, here are the abbreviations we’ll be using:
- Ch – Chain
- SC – Single Crochet
- DC – Double Crochet
Getting Started: Foundation Chain
First things first, let’s get started with the foundation chain. Start by making a slip knot on your hook.
Now, here’s a key thing to remember: the Silt Stitch pattern needs a foundation chain that is a multiple of three. Why? Because the stitch pattern repeats every three stitches. If you don’t use a multiple of three, the pattern won’t line up correctly.
For example, you could chain 15, 18, or 21. Just pick a multiple of three that gives you the width you want for your project.
Before you get started…
Check out my Favorite items and tools
Rechargeable LED night reading light on Amazon
Bamboo Hooks on Amazon
Colorful Bobby pins as crochet markers on Amazon
Step-by-Step Instructions: The Silt Stitch
Alright, let’s dive into the actual stitch! This stitch pattern is a two-row repeat, making it easy to memorize.
Row 1: Foundation Row (Double Crochet Row)
- Start with a double crochet in the fourth chain from the hook. Don’t count the loop on your hook.
- Those first three chains that you skipped? They count as your first double crochet stitch.
- Now, work one double crochet in each chain across the entire row.
This row is the base for the whole pattern, so make sure you get it right.
Row 2: First Row of the Two-Row Repeat
- Chain one and turn your work.
- In the very first stitch, work one single crochet and two double crochets. All in the same stitch.
- Skip two stitches.
- In the third stitch, repeat the combination: one single crochet and two double crochets in the same stitch.
- Keep repeating this pattern across the row.
- When you get to the end, you should have three stitches left. Work one single crochet in the last stitch (which is the chain three from the beginning of the previous row).
Row 3: Second Row of the Two-Row Repeat
- Chain three and turn your work.
- Work one double crochet on top of each stitch from the previous row.
- Remember that the chain three counts as your first stitch.
- It’s super important to count your stitches after this row! Make sure you have the same number of stitches as you did in the first row. This helps you avoid accidentally increasing or decreasing the number of stitches, which can mess up the pattern.
- Repeat the double crochet across the entire row.
Repeating the Pattern
Guess what? You’ve already learned the whole stitch! The Silt Stitch pattern is just a two-row repeat.
- Row 1: (Single crochet, two double crochet) in the same stitch, skip two.
- Row 2: Double crochet across.
Just keep repeating those two rows until your project is as long as you want it to be!
Love This Pattern? There’s More Where That Came From!
You will discover my complete collection of crochet patterns, tutorials, and resources, both free and premium all in one convenient place.
I know you’ll find something to inspire your next project🙃
All Things Crochet Start Here →
Tips and Tricks
Here are a few tips to help you along the way:
- Stitch markers: Use stitch markers to mark the beginning or end of rows. This can help you keep track of your place, especially when you’re first learning the pattern.
- Tension: Try to maintain a consistent tension as you crochet. This will help your finished piece look uniform and even.
- Blocking: Blocking your finished piece can really enhance the texture of the Silt Stitch. Blocking is a process of wetting and shaping your crochet project to help the stitches relax and even out.
Customization Options
Want to get creative with the Silt Stitch? Here are some ideas:
- Color changes: Change colors every few rows for a unique and colorful effect.
- Yarn weights: Use different yarn weights to create different textures. A thicker yarn will give you a chunkier texture, while a thinner yarn will create a finer texture.
- Hook sizes: Experiment with different hook sizes to see how it affects the stitch.
Share Your Projects!
I can’t wait to see what you create! Share your finished Silt Stitch projects with me here
So, what do you think? Will you give the Silt Stitch a try? Grab your hook and yarn, and let’s get crocheting!
Want more stitch tutorials:
Click here to share your finished project with our community!
A new stitch step
- When learning a new stitch, try several yarn weights and hook sizes to understand how the stitch works and looks.
- Use light yarn colors to get the stitch to form the right shape.
- Make several swatches before starting a new project
Stay Calm and Crochet!😎
Sandra
Interested in a professional Paperback Crochet Planner?
DISCLOSURE
AMAZON ASSOCIATES: Sandra Stitches is a participant in the Amazon Services LLC Associates Program, an affiliate advertising program designed to provide a means for sites to earn advertising fees by advertising and linking to Amazon.com.
This post contains links to products that I use and recommend, If you purchase any using my links I get a very small fee at no ad to you! Thank you for supporting my small biz!

