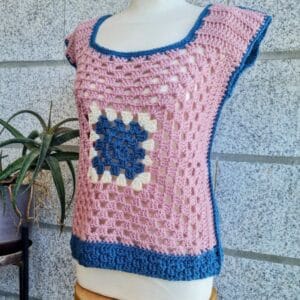
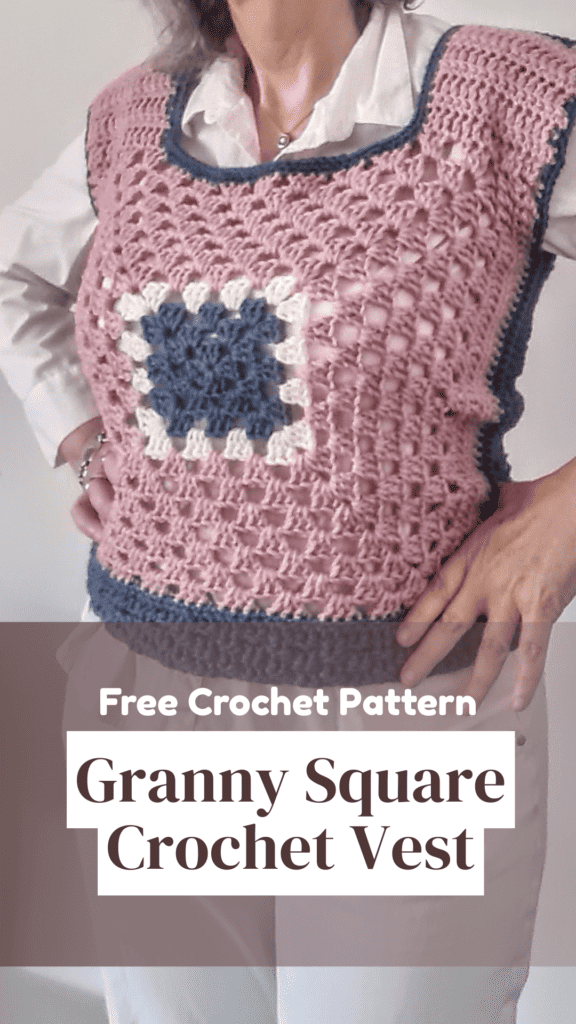
When talking about a Granny Square Crochet Vest Pattern you probably imagine lots of squares and endless weaving in yarns.
Well, this granny square top pattern is made with 2 big squares so no yarns are hanging and waiting to be weaved in.
Are you with me?
There are 2  ways to get this pattern:

Option 1: You can purchase the individual pattern as an easy-to-read, print-friendly PDF  from HERE

Option 2: Scroll down to get the written instructions for this pattern for free
Do you want to save this post for later? Go ahead and PIN IT!

You will find instructions in the free pattern below ⬇️
** Some of the links in this post may include affiliate links. Purchasing one of these links pays me a small referral fee at no added cost to you. These small fees add up and help me keep the blog running. View our Disclosure and Privacy Policy for more information.
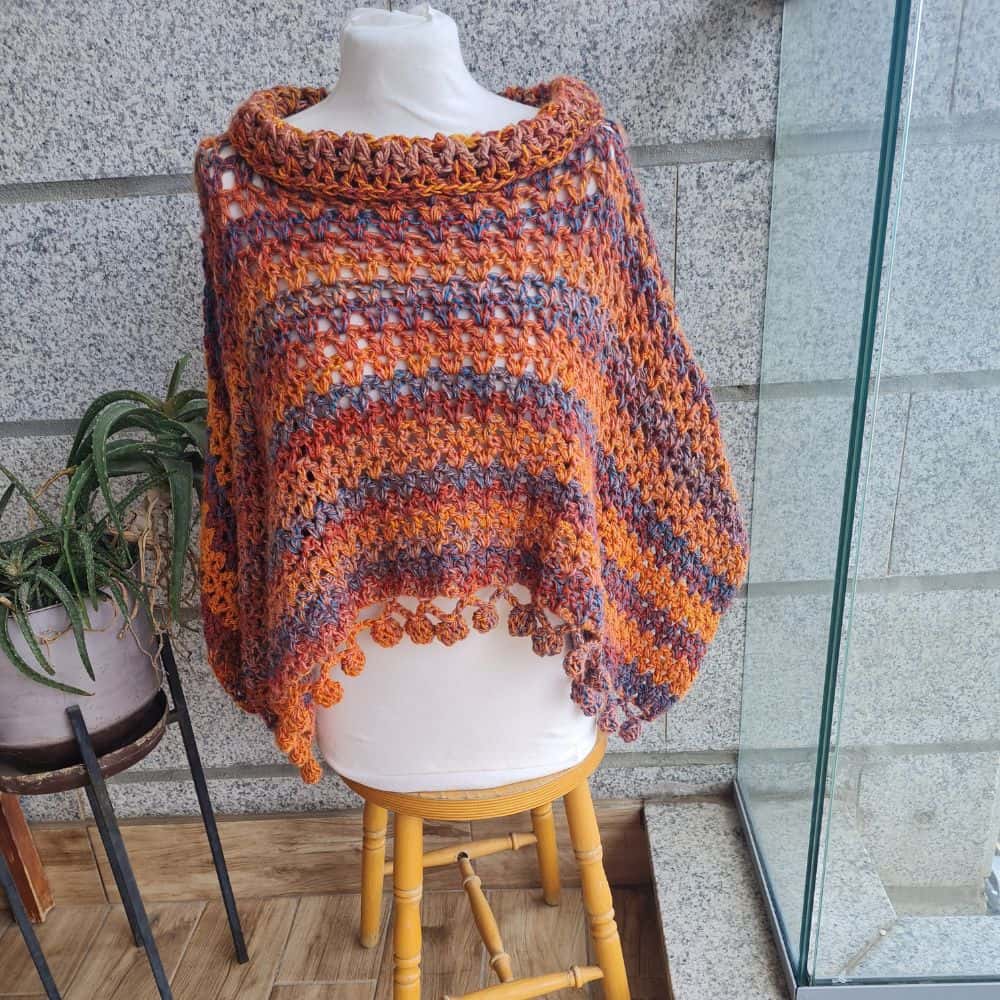
Want a cool, vintage look? Make a granny square crochet vest!
This guide shows you how to crochet your own vest. It’s easy to adjust the size. Learn to create a unique piece for your closet.
Before you get started, check out my Favorite Crochet Tools (affiliate)
Yarn Winder – a perfect crochet accessory
Neck Stretcher – to keep you without neck and back pain
Gauge Ruler – so you always get the right size
Pattern Designed By: Sandra Stitches This pattern is copyright protected; it is unlawful to distribute this pattern in any form (free, sale or trade).
How can I avoid my granny squares from twisting?
To avoid your granny squares from twisting, consider the following methods:
- Turn Your Work: One of the most effective ways to prevent twisting is to turn your granny square after every round. This ensures that the subtle lean of the stitches doesn’t accumulate in the same direction, keeping the square straight.
- Use Taller Stitches at Corners: Another method involves using taller stitches at the corners of your granny square. This helps shift the material and prevent twisting. You can replace the last set of stitches on each side with extended stitches
- Blocking: While not a preventative measure, blocking can help correct twisting after the square is completed. Wet-blocking with pins can straighten out the square, especially if done regularly during the project.
- Consistent Tension: Maintaining consistent tension while crocheting is crucial. If your stitches are too tight or loose, it can contribute to twisting.
- Pattern Adjustments: Some patterns are designed to minimize twisting, such as reversible patterns that hide color changes well. Experimenting with different patterns might help find one that naturally resists twisting.
Let’s get to the pattern, shall we? Making the Monday Vest

Materials I used
This is the yarn I had at hand – do not forget I make a sample for you to learn- so be creative and choose the yarn you love. Feel it before starting your project.
I know there are a million different yarn choices that also depend on where you live, so just be creative!
Cygnet Aran 100 gr, 100 % Acrylic, 210 m, Color 185 (Denim) (2 Skeins)
Cygnet Aran 100 gr, 100 % Acrylic, 210 m, Color 275(Blush) (1 Skein)
Cygnet Aran 100 gr, 100 % Acrylic, 210 m, Color 288 (Cream)
Or any weight #4 yarn of your choice
Hook: US Size (US Size J-10 (6 mm) for the body, 5mm for the Brim, and 4mm for the assembly)
Yarn Needle, Scissors, Measuring Tape
Gauge
- 12 st X 6 rows ( 4” X 4”)
Sizes
- This sample is: 23” high and 19” wide, Size M/L for women
Stitch Key
- Ch = Chain
- Sc = Single Crochet
- St = Stitch
- Dc = Double Crochet
- Hdc = Half Double Crochet
- Tr = Treble Crochet
Specialty Stitches
Fpdc = Front Post Double Crochet
Yarn over, insert hook, front to back between the posts of the next stitch of the previous row, moving your hook around the DC that is located right below the stitch you are making, and back to the front, Yarn over and pull the loop and finish your Dc
Bpdc = Back Post Double Crochet
Yarn over, Insert the hook into the hole next to the post of the next stitch, on the “hook side” from back to front, and bring the hook back to the back of the fabric around the post, to the hole farther from the hook, Yarn over and draw through a loop, finish your Dc
Notes
- This pattern uses US terminology
- The pattern is worked in rounds for the body and rows for the Brim and Sides
- This pattern is worked in separate parts and joined together
- Ch3 does count as st at the beginning of each row
- This pattern uses pattern repeats.
- You can work this pattern with one color or multiple as you wish- I used three solid colors
- If changing colors make sure to have a changing technique and weave your ends in.
- You can decide on the width and length of the Vest by adding rounds to the Granny Square
Instructions
The Granny Square Body (two exact Squares for front and back)
Choose your colors and decide when to change
I made the back square in one color and the front square in three colors
Foundation: Ch4 and Slst to form a ring or use the magic circle
Round 1: (Right Side): Ch 3 (first Dc, here and throughout), work 2 Dc into the loop, [Ch 3, Dc 3] 3 times, Ch 3, Sl St into the top of beginning Ch-3 to join, turn (24 Sts; 12 Dc + 4 Ch-3 spaces)
Round 2: Sl St into each of next 2 Dc, Sl St into Ch-3 space, Ch 3, (Dc2, Ch 3, Dc 3) into same Ch-3 space, Ch 1, [ Dc3, Ch 3, Dc3) into next Ch-3 space, Ch 1] 3 times, Sl St into the top of beginning Ch-3 to join, turn
Round 3: Sl St into each of next 2 Dc, Sl St into Ch-3 space, Ch 3, (Dc2, Ch 3,Dc3) into same Ch-3 space, Ch 1, (Dc 3, Ch 1) into Ch-1 space, [Dc 3+ Ch 3+Dc3) into next Ch-3 space, Ch 1,
( Dc 3+ Ch1) into Ch-1 space] 3 times, Sl St into top of beginning Ch-3 to join , turn
Rounds 4- 11: repeat round 3 , working (Dc3 +Ch3 +Dc3) in corners , Ch1 (Dc3 +Ch1) in every Ch1 space in between corners

Sides
Lay one square flat right side up.
Row 1: Insert yarn in any corner, Ch1, Dc1 in 1st st from hook, Dc1 in every st across to end of the row, turn
Row 2: Ch1, Sc1 in 1st st from hook and across to the end of the row, turn
Row 3: Ch1, Dc1 in 1st st from hook, Dc1 in every st across to end of the row, turn
Row 4: Repeat Row 2
Repeat on the opposite side of the Square
Repeat on the second square
Love This Pattern? There’s More Where That Came From!
You will discover my complete collection of crochet patterns, tutorials, and resources, both free and premium, all in one convenient place.
I know you’ll find something to inspire your next project🙃
All Things Crochet Start Here →
Brim
Lay one square flat right side up.
Use one size-down hook
Work the same on the two panels
Row 1: Insert yarn, Ch1, Dc1 in 1st st from hook, Dc1 in every st across to the end of the row, Make sure to Dc in every Ch1 space and Dc3 granny cluster, turn
Row 2: Ch1, *[Fpdc 1 in next st, Fpdc 1 in next st, Bpdc1 in next, Bpdc 1 in next ]* repeat from *to* to end of row
Row 3: Ch1, *[ Fpdc 1 in next st, Fpdc 1 in next st, Bpdc1 in next, Bpdc 1 in next ]* repeat from *to* to end of row
Row 4+5: Repeat rows 2+3
If you want your brim to be wider, continue repeating rows 2+3
Neck hole and shoulders Front panel
Lay Front square flat right side up.
Row 1: Starting from one side towards the center: Insert yarn, Ch1, Dc1 in 1st st, Dc 1 in next st and in next 12 st for a total of 14 Dc, turn
Row 2: Ch1, Sc1 in 1st st from hook and across to the end of the row, turn
Row 3: Ch1, Dc1 in 1st st from hook, Dc1 in every st across to end of the row, turn
Row 4-10: Repeat Rows 2+3
Repeat on the opposite side starting from the center out counting your total of 14 stitches

Neck and Shoulders Back Panel
The back panel does not have a Neck hole
Row 1: Insert yarn, Ch1, Dc1 in 1st st, Dc 1 in next st and across to the end of the row, turn
Row 2: Ch1, Sc1 in 1st st from hook and across to the end of the row, turn
Row 3: Ch1, Dc1 in 1st st from hook, Dc1 in every st across to end of the row, turn
Row 4-10: Repeat rows 2+3
Finishing
Lay two finished panels right side in- facing the wrong side towards you and the table.
Sew two shoulders front to back panels
Measure approx 17 cm from shoulder down for the Arm Hole on both sides and sew the sides
Using 2 sizes down Hook: Work a Single Crochet st row around the Armholes
Using 2 sizes down Hook: Work two Single Crochet rows around The Neck hole
Cut your yarn and weave in the ends.
Do you want to save this post for later? Pin it!
Want more top patterns?
DISCLOSURE
AMAZON ASSOCIATES: Sandra Stitches is a participant in the Amazon Services LLC Associates Program, an affiliate advertising program designed to provide a means for sites to earn advertising fees by advertising and linking to Amazon.com.
This post contains links to products that I use and recommend, If you purchase any using my links I get a very small fee at no ad to you! Thank you for supporting my small biz!

