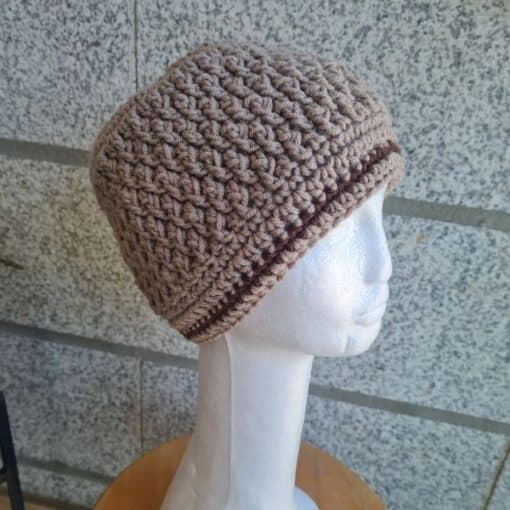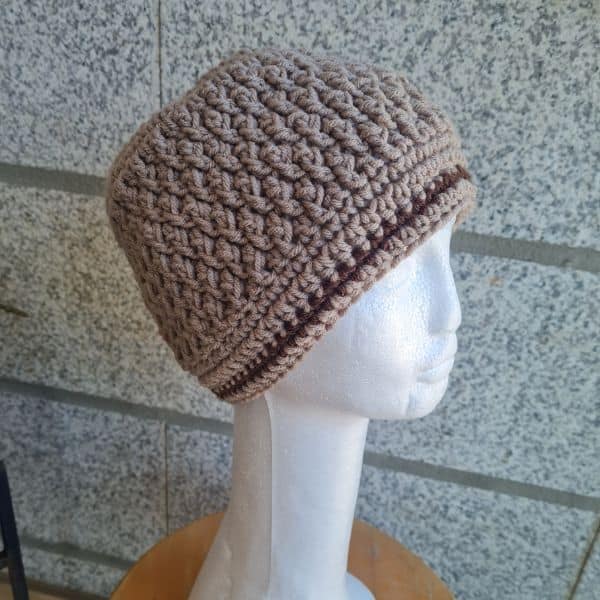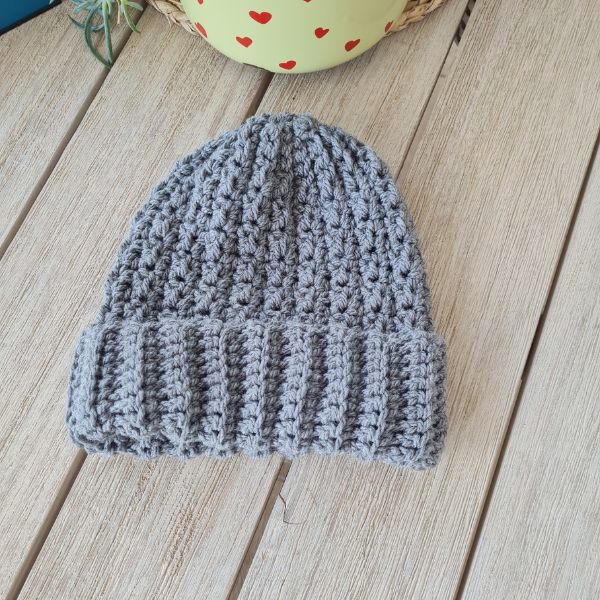
Let’s talk about the Choco Beanie, my newest favorite hat. This one’s part of our 2025 From Us to You Crochet Donation Challenge, and April happens to be Husband Appreciation Day, so brown felt like the right color to build it around.
Quick answer: This is the Choco Beanie, a textured crochet beanie made with front post double crochet stitches, worked top down in two colors with a reversed single crochet edge. It’s easy to make, not too simple but not fussy either.
Jump straight to the Choco Beanie pattern ↓
This hat pattern is part of a set. The matching scarf, made with the same stitch pattern and color, is over on Helen’s blog, published April 23rd, 2025
Find the free pattern below or purchase the ad-free PDF version of this pattern HERE. The PDF is designed for printing, and this way, you can support me! Thank you
This pattern is part of the 2025 From Us to You Crochet Donation Challenge – scroll down for details 👇
Do you want to save this post for later? Go ahead and PIN IT!

Why the Front Post Texture Works So Well on the Choco Beanie
The front post double crochet is what gives this hat its texture, it creates a neat, raised pattern that looks a lot more complicated than it actually is.
That white trim at the brim adds just the right touch of contrast without overcomplicating the color work.
If you like texture like this, the Bar Stitch Textured Beanie plays with a similar idea.
** Some of the links in this post may include affiliate links. Purchasing from one of these links pays me a small referral fee at no added cost to you. These small fees add up and help me keep the blog running. View our Disclosure and Privacy Policy for more information.
Before you get started, check out my newest favorite finds!
Yarn Winder – a perfect crochet accessory
Neck Stretcher – to keep you without neck and back pain
Gauge Ruler – so you always get the right size
Choco Beanie Instructions
Difficulty
Intermediate
Materials
- 100% Acrylic, 100gr, weight #4 yarn, approx 280 yards in Chocolate Brown and some in white
- Hook: 5 mm
- Yarn Needle, Scissors, Measuring Tape
Gauge
- 14 st X 7 rows ( 4” X 4”)
Sizes
S ( 19” – 20” circumference)
M (21” – 22” circumference)
L (22” – 23” circumference)
This sample is M/L in size and has a 22” circumference
Stitch Key
- Ch = Chain
- St = Stitch
- YO = Yarn Over
- Sc = Single Crochet
- Dc = Double Crochet
- Inc = Increase Rouns
Specialty Stitches
Dc2Tog = 2 double crochet together
Yo, insert hook in st, yo, draw a loop, yo, draw yarn through 2 loops) twice in the same st, yo, draw yarn through 3 loops on the hook.
FpDc = Front Post Double Crochet
[Yo, insert hook under the post of next st, yo, draw up a loop (3 loops on hook), yo, draw through 2 loops on hook (2 loops on hook), yo, draw through last 2 loops on hook]
Rsc = Reversed Single Crochet
Insert the hook, from front to back, in the next stitch to the right (going backward). Yarn over (yo) draw a loop, and finish the single crochet
If you need a visual tutorial for the stitch, follow the videos 👇
Notes
- This pattern uses US terminology
- The pattern is worked in rounds
- Ch 1 at the beginning of the row does not count as st
- Ch 3 at the beginning of the row does count as st
- This pattern uses pattern repeats.
- When joining to complete a round, join to the first st in that round
- You can work this pattern with one color or multiple as you wish- I used two solid colors
- This pattern is worked top-down
Sandra’s tip: Front post stitches naturally make a denser, more ribbed fabric than a regular double crochet. If it feels a little stiff or thick as you work it, that’s expected, it relaxes and softens once the hat is finished and worn a few times. If you want it softer from the start, a lighter weight yarn than the one called for here will give you more give.
If you want a change of shape after this one, the Starry Nights Slouchy Hat is a nice next make.

Instructions
Chain 4, Slst to 1st ch to form a circle or use the magic circle method
Round 1: Ch 3, Dc 11` more st into the circle, Slst to Ch 3 to close the round (12)
Round 2: INC Ch 3, dc1 in same st, dc 2 in next st and around to end of round, Slst to Ch 3 to close the round (24)
Round 3: INC Ch 3, dc 1 in next st, Fpdc 2 in next st, *dc 1 in next 2 st, FpDc 2 in next st, repeat from * to last st, Slst to Ch 3 to close the round (36)
Round 4: INC Ch 3, dc 1 in next 2 st, dc 2 in next st, *dc 1 in next 3 st, dc 2 in next st, repeat from * to last st, Slst to Ch 3 to close the round (48)
Round 5: INC Ch 3, dc 1 in next 3 st, Fpdc 2 in next st, *dc 1 in next 4 st, FpDc 2 in next st, repeat from * to last st, Slst to Ch 3 to close the round (60)
Round 6: Ch 1, sc 1 in 1st st from the hook, sc 1 in next st and around to the end of the round, Slst to Ch 3 to close the round (60)
Round 7: Ch 1, sc 1 in 1st st from the hook, sc 1 in next st and around to the end of the round, Slst to Ch 3 to close the round (60)
Flip your work to the wrong side
Round 8: Ch 3, skip 1 st, dc 1 in next st, ch 1, *Dc2tog starting in the last st you worked skip 1 st and finishing in the next st, ch 1, repeat for * around, Slst to Ch 3 to close the round (60)
Round 9: Ch 4 Counts as dc +ch 1), *Fpdc around the Dc2tog from prev round, ch 1, repeat from * around, Slst to Ch 3 to close the round (60)
Rounds 10-13: Repeat rounds 8+9
If you need a longer hat, continue these rounds to your measurement
Flip your work back to the Right side
Round 14: Ch 3, *dc 1 in next ch 1 space, dc 1 in next st (place 1 dc in every stitch around), repeat from * around to end of the round, Slst to Ch 3 to close the round (60)
Round 15: Ch 3, *Fpdc in next st, dc 1 in next st, repeat from * to end of the round, Slst to Ch 3 to close the round (60)
Change to color white
Round 16: Ch 3, *Fpdc in next st, dc 1 in next st, repeat from * to end of the round, Slst to Ch 3 to close the round (60)
Round 17: Ch1, reverse sc 1 in each st around, Slst to 1st st to close the round (60)
Finishing
Cut your yarn and weave in the ends.
Enjoy!
**This is an original Sandra Regev pattern: Owner /Designer of Sandra Stitches. This pattern may not be redistributed for free, sale, or trade, but finished products can be sold with credit to this shop – enjoy!
Follow the main Post for all 2025 From Us to You Crochet Donation Challenge Patterns👇
Find our 2024 challenge with all the free patterns👇
From Us to You Crochet Donation Challenge 2024
FAQ
This almost always comes down to gauge. Everyone’s tension is a little different, even using the same hook and yarn as the pattern calls for. Work a small swatch first and check your stitch count against the gauge given, if you’re off, go up or down a hook size before starting the hat itself.
Tension tends to shift as you go, looser at first, tighter as you get tired or focused, or the reverse. Try to check your gauge again every few rounds, especially on a longer pattern like this one, staying consistent matters more than starting perfectly
Not exactly. This pattern gives S, M, and L options for that reason, measure your own head circumference and pick the closest size, rather than assuming “one size” covers everyone.
t’s rated intermediate. It uses single crochet, double crochet, and three specialty stitches (front post double crochet, two double crochet together, and reversed single crochet).
A quiet place to keep crocheting
If projects like this one are your kind of calm, you might love the V-Stitch Club.
It is my little corner of the internet for women who crochet for the joy and the quiet of it, with new patterns, gentle company, and the steady rhythm of always having something beautiful on the hook.
Be Part of The Tribe!
Come share your finished Ridgeline Beanie in my free Facebook group. Join Crochet & Stories with Sandra Stitches.
Questions?
Ask and share in our
FREE Facebook Group
DISCLOSURE
AMAZON ASSOCIATES: Sandra Stitches is a participant in the Amazon Services LLC Associates Program, an affiliate advertising program designed to provide a means for sites to earn advertising fees by advertising and linking to Amazon.com.
This post contains links to products that I use and recommend, If you purchase any using my links I get a very small fee at no ad to you! Thank you for supporting my small biz!

Hi my crochet friend!
Crochet has followed me from Argentina to Israel and through every crossroads since. Now I design calm, achievable crochet, made to feel possible.
Come find free patterns, tutorials, and the V-Stitch Club right here on the blog.