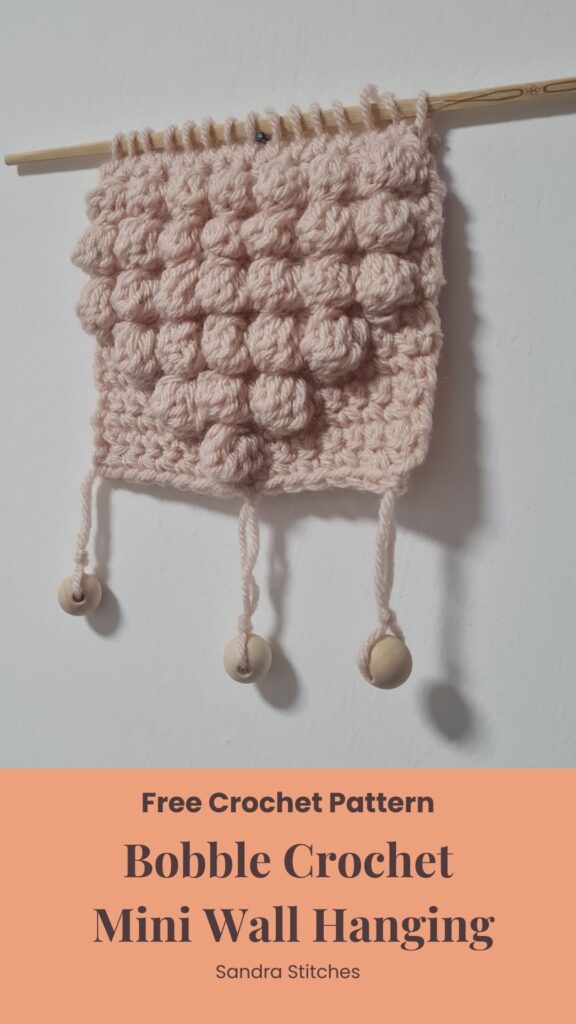
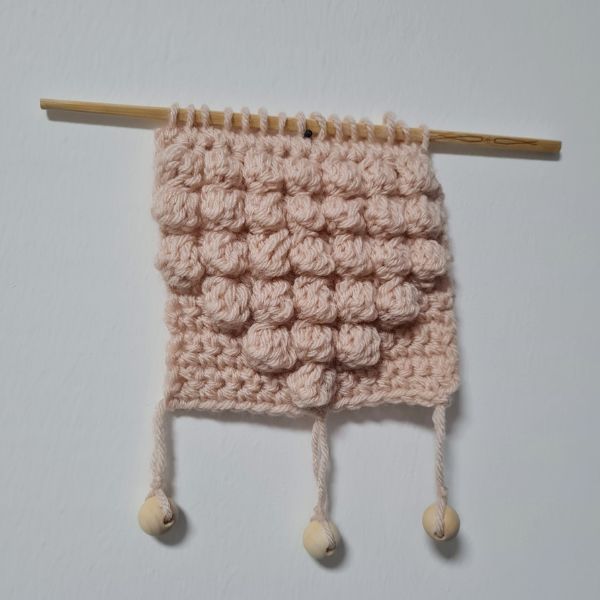
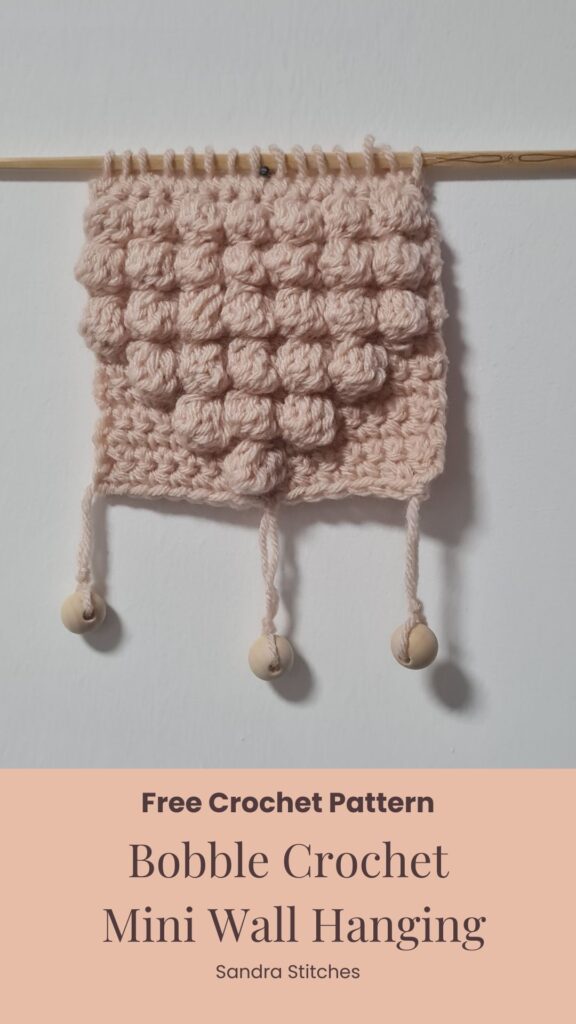
This Bobble Crochet Mini Wall Hanging Pattern is so cute and such a quick crochet project you will want to make a few and decorate your office, bedroom or kitchen!
I wanted to add some Boho style to my craft room, this bobble crochet wall hanging was the faster solution!
Try and imagine where else you can hang this bobble crochet.
Are you with me?
This pattern is part of the 8 Hanukkah Miracles Crochet Along 2024- follow the main post 👇

There are 2  ways to get this pattern:

Option 1: You can purchase the individual pattern as an easy-to-read,ad-free, print-friendly PDF  from Ravelry

Option 2: Scroll down to get the written instructions for this pattern for free
Do you want to save this post for later? Pin it 👇
About using the bobble crochet stitch
This stitch is like the secret weapon that transforms your ordinary projects into something extraordinary, with these cute little puffy bumps that practically jump off the fabric.
Don’t let its complex look intimidate you – once you master the technique, you’ll be sprinkling bobbles onto everything from snuggly blankets to stylish accessories.
The trick is working multiple stitches into the same spot and then magically bringing them together, creating these raised clusters that add serious personality to your work.
If you’re looking to break out of your crochet comfort zone and add some serious texture and visual interest, the bobble stitch is about to become your new crafting obsession.
You will find instructions in the free pattern below ⬇️
** Some of the links in this post may include affiliate links. Purchasing one of these links pays me a small referral fee at no added cost to you. These small fees add up and help me keep the blog running. View our Disclosure and Privacy Policy for more information.
Before you get started, check out my Favorite Crochet Tools (affiliate)
Yarn Winder – a perfect crochet accessories
Neck Stretcher – to keep you without neck and back pain
Gauge Ruler – so you always get the right size
Pattern Designed By: Sandra Stitches This pattern is copyright protected; it is unlawful to distribute this pattern in any form (free, sale or trade).
▶️ Add this pattern to your Ravelry favorites here
Let’s get to the pattern, shall we? Making a Bobble Crochet Mini Wall Hanging

Materials
- Cygnet Yarn, Aran, 100gr, 100% Acrylic, 210 mt, 230 yards any color 30 gr
- Or any weight #4 yarn
Hook: US Size J 6 (4.00 mm)
Yarn Needle, Scissors, Measuring Tape
Gauge
- not relevant
Sizes
This sample is 5” X 5” square
Stitch Key
- Ch = Chain
- Sc = Single Crochet
- Dc = Double Crochet
- St = Stitch
- Bo = Booble stitch
Specialty Stitches
Bobble stitch Yo, insert hook in st, yo and draw up a loop, yo and pull through 2 loops 5 times (6 loops on the hook), yo and pull through all loops on hook.
Notes
- This pattern is written in US terminology
- Ch 1 at the beginning of the row does not count as st
- This pattern uses pattern repeats.
- You can work this pattern with one color or multiple as you wish- I used one solid color
- If changing colors make sure to have a changing technique and weave your ends in.
Instructions
Ch 16
Row 1: Sc1 in 2nd ch from hook, sc1 in next and across to end of row (15 st)
Row 2: Sc1 in 1st st from hook, sc1 in next 6 st, Bo in next st, sc 1 in next 7 st (15 st)
Row 3: Sc1 in 1st st from hook, sc1 in next and across to end of row (15 st)
Row 4: Sc1 in 1st st from hook, sc1 in next 4 st, *Bo in next st, sc 1 in next st, repeat two more times, sc 1 in next 4 st (15 st)
Row 5: Sc1 in 1st st from hook, sc1 in next and across to end of row (15 st)
Row 6: Sc1 in 1st st from hook, sc1 in next 2 st, *Bo in next st, sc 1 in next st, repeat four more times, sc 1 in next 2 st (15 st)
Row 7: Sc1 in 1st st from hook, sc1 in next and across to end of row (15 st)
Row 8: Sc1 in 1st st from hook, *Bo in next st, sc 1 in next st, repeat six more times, sc 1 in next st (15 st)
Row 9: Sc1 in 1st st from hook, sc1 in next and across to end of row (15 st)
Row 10: Sc1 in 1st st from hook, *Bo in next st, sc 1 in next st, repeat six more times, sc 1 in next st (15 st)
Finishing
I used a wooden chopstick and Slst it to the square.
At the bottom, I used wooden beads in same color to add more texture and length
You can add beads, make it longer or shorter as you wish
Did you try this Pattern? Share a picture
Tag me on Instagram
@sandrastitchesil
Do you want to save this post for later? Pin it 👇
Want more for the home patterns?
Naples Table Runner – Boho style
Liri Plastic Bags Holder – Boho Style
DISCLOSURE
AMAZON ASSOCIATES: Sandra Stitches is a participant in the Amazon Services LLC Associates Program, an affiliate advertising program designed to provide a means for sites to earn advertising fees by advertising and linking to Amazon.com.
This post contains links to products that I use and recommend, If you purchase any using my links I get a very small fee at no ad to you! Thank you for supporting my small biz!
**This is an original Sandra Regev pattern: Owner /Designer of Sandra Stitches. This pattern may not be redistributed for free, sale, or trade, but finished products can be sold with credit to this shop – enjoy!


