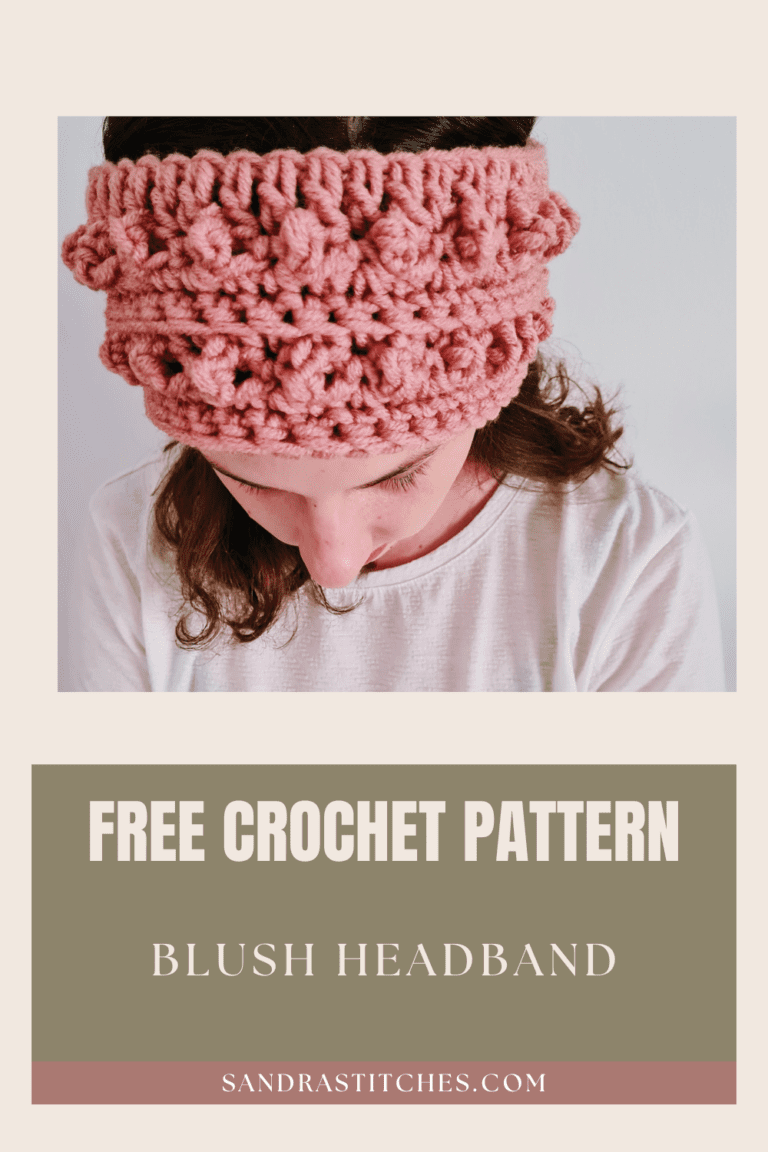
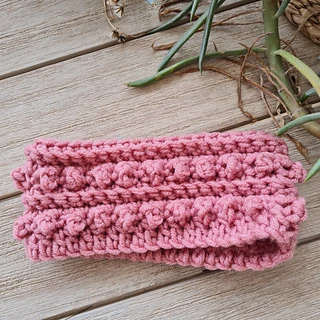
Let’s use that super bulky yarn and warm your ears with this Crochet Headband
Can you spot the texture? Using a small puff stitch that is so easy to work, you can have a great end-of-year gift, a girl’s surprise, and a super warm and cozy crochet headband!
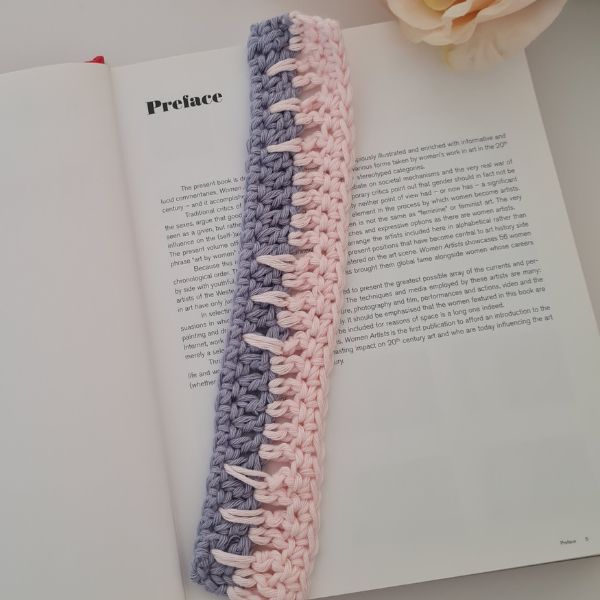
The Blush Headband / Earwarmer
Want to save this post for later? Go ahead and PIN it!
This easy crochet headband is kind of Boho style and uses beginner’s crochet stitches so anyone can make it.
You can use any 4-5 weight yarn in your stash.
Ready to make your own?
Difficulty
- Beginner Friendly
Materials Used
- Alize Superlana Maxi 75% Acrylic 25% Wool, 100gr 100mtr 109 yds
- 7mm hook ,scissors, tapestry needle.
Measurements
One Size Women Adult
Length:25 “ 65cm width: 4.5” 11cm
Stitches Used
ch = chain dc = double crochet
Blosc = back loop only single crochet
SPuff = simple puff stitch
Sc = single crochet
st = stitches
Gauge for this pattern using this yarn:
10cmX10cm = 9 st X 8 rows
Instructions:
This Blush Headband Ear Warmer is the perfect one for the windy days in late December and winter days. It is wide, cozy, and very textured so it gives you the feeling of Hygge
This Pattern is beginners friendly, it uses only basic stitches, of course you have to be familiar with single crochet, double crochet, half double crochet, and slip stitch, if you are not please visit any YouTube Channel tutorial before starting this Project.
I love to use Bamboo Hooks for durability and Eco conciseness. I got my Set Here (Affiliate)
- Instructions for the S Puff stitch will be in the pattern
- This pattern is made with very bulky yarn for maximum warmth and texture.
- This pattern is made in Rows
- Please make a gauge before you start to count your measurements with the specific yarn of your choice.
- Of course, you can choose any combination of colors or make it with one color as you wish!
Instructions:
Foundation chain: ch 45
R1: dc in 4th ch from hook (first 3 ch count as 1st dc), dc in next ch and all across to the end of the row, turn your work = 42 st
R2 : Now we will make the SPUFF st. It is very simple: ch1, sc in first st from hook, tr in next st, sc in next st, tr in next st, sc in next, and so on across to the end of row- 1 tr, 1sc. this gives us the simple puff stitch- finish with an sc and turn work
Now to R3:ch1 and sc in 1st st from hook, sc in next st (top of the spuff st from prev row), sc in next st and so on across to end of row- 1 sc in every st from prev row. Please count your st as to make sure you did not inc or dec the number of stitches= 42 st, Turn your work
R4: ch 1 and sc in 1st st from prev row, blosc in next st, blosc in every st across to end of row
R5: repeat R4 ( BLOSC in every st across to end of row)
We go on…
Att: R6: A second row of SPUFF st. again: ch1, sc in first st from hook, tr in next st, sc in next st, tr in next st , sc in next and so on across to the end of row- 1 tr, 1sc . finish with a sc and turn work
R7: ch1 and sc in 1st st from hook, sc in next st (top of the spuff st from prev row), sc in next st and so on across to end of row- 1 sc in every st from prev row.
Repeat rows: R8+9: ch 1 and sc in 1st st from prev row, blosc in next st, blosc in every st across to end of row. Cut the yarn, secure it and weave in ends
Get your AD-FREE downloadable PDF here
Did you try this out? Share your project!
– Let me know how it went and leave a comment below
– Tag me @sandrastitches
– Join and share in our FB Community
DISCLOSURE
AMAZON ASSOCIATES: Sandra Stitches is a participant in the Amazon Services LLC Associates Program, an affiliate advertising program designed to provide a means for sites to earn advertising fees by advertising and linking to Amazon.com.
This post contains links to products that I use and recommend, If you purchase any using my links I get a very small fee at no ad to you! Thank you for supporting my small biz!

8 thoughts on “Free Crochet Headband Pattern”