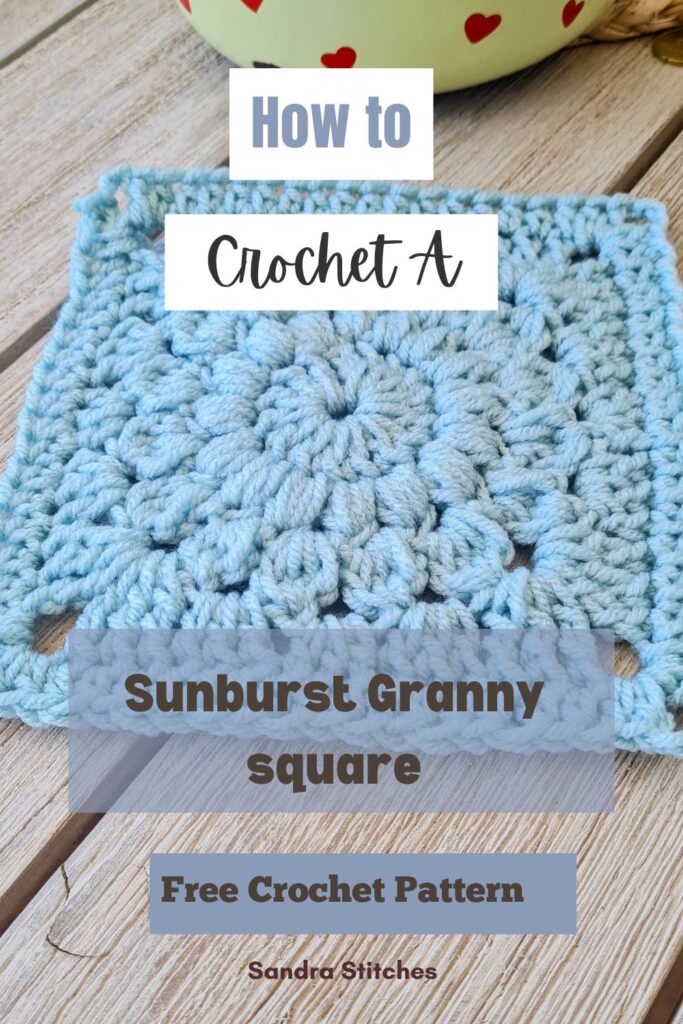
Hey there, crochet friends! I’ve got something super exciting to share with you today – a free pattern for the most adorable Sunburst Granny Square you’ve ever seen!
I stumbled upon this design a while back and instantly fell in love with all the possibilities it can open in my designs
Trust me, once you start making these sunny little squares, you won’t be able to stop – they’re seriously addictive! So, ready to add some sunshine to your crochet projects? Let’s dive in!
Are you with me?
There are 2  ways to get this pattern:

Option 1: You can purchase the individual pattern as an easy-to-read, print-friendly PDF  from Ravelry

Option 2: Scroll down to get the written instructions for this pattern for free
You will find instructions in the free pattern below ⬇️
** Some of the links in this post may include affiliate links. Purchasing one of these links pays me a small referral fee at no added cost to you. These small fees add up and help me keep the blog running. View our Disclosure and Privacy Policy for more information.
Before you get started, check out my Favorite Crochet Tools (affiliate)
Yarn Winder – a perfect crochet accessories
Neck Stretcher – to keep you without neck and back pain
Gauge Ruler – so you always get the right size
Pattern Designed By: Sandra Stitches This pattern is copyright protected; it is unlawful to distribute this pattern in any form (free, sale or trade).
▶️ Add this pattern to your Ravelry favorites here
Let’s get to the pattern, shall we? Making the Sunburst Granny Square

Materials
Stylecraft Special Chunky, 100 gr, 100% Premium Acrylic. 144 meter / 157 yards, shades: Duck Egg
Find substitutions HERE or any weight #5 yarn
You can work this pattern with any yarn weight and hook size, it will change the measurements.
Or any weight #4 yarn

Hook: US Size (6 mm)
Yarn Needle, Scissors, Measuring Tape
Gauge
- Not relevant
Sizes
- Each square is 9” X 9”
Stitch Key
- Ch = Chain
- Sc = Single Crochet
- St = Stitch
- Dc = Double Crochet
- Hdc = Half Double Crochet
- Yo = Yarn over
- INC = Increase round
- Slst = Slip stitch
Specialty Stitches
Puff stitch = Yarn over, Insert hook into stitch or space indicated, pull up a loop – 3 loops on hook, Yo, insert hook in same st, pull up a loop 5 st on hook, do it one more time – 7 loops on your hook, Yo pull through all loops on hook, Ch 1.
Dc3Tog = Double Crochet 3 together: Yo, insert hook in last st, pull up a loop, yo and pull through 2 loops 3 times, Yo and pull through all loops on your hook,
Dc4Tog =Double Crochet 4 together: Yo, insert hook in last st, pull up a loop, yo and pull through 2 loops, 4 times, Yo and pull through all loops on your hook
Notes
- This pattern is written in US terminology
- This pattern is worked in rounds
- Ch 3 does count as st at the beginning of each round
- Ch1 at the beginning of the row does not count as a stitch
- This pattern is for one crochet square
- I used a solid color – you can change colors at different rounds as you wish
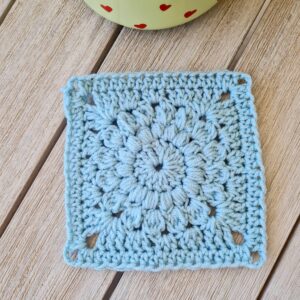
Instructions
Chain 4, Slst to 1st ch to form a circle or use the magic circle method
Round 1: Ch 3, Dc 15 more st into the circle, Slst to Ch 3 to close the round (16)
You can change colors here
Round 2: Ch 1, puff st in 1st st from hook, Puff st in next st and every st around to end of round, skip the 1st puff st and Slst into the ch1 space (16 puffs and 16 ch 1 spaces)
You can change colors here
Round 3: Ch 2, dc3tog in 1st st from hook (in the ch1 space), ch 2, dc4tog in next ch 1 space, ch 2, and around to end, skip the 1st cluster and slst to next ch 1 space (16 clusters and 16 ch2 spaces)
You can change colors here
Now we will square the circle
Round 4: Ch 4 (counts as 1st tr), tr 2 in same ch 2 space, dc 3 into next ch 2 space, hdc 3 in next ch 2 space, dc 3 in next ch 2 space, (tr 3 + ch 2 + tr 3) in next ch 2 space this will form our 1st corner, dc 3 in next ch 2 space, hdc 3 in next ch 2 space, dc 3 in next ch 2 space, (tr 3 + ch 2 + tr 3) in next ch 2 space this will form our 2nd corner, dc 3 in next ch 2 space, hdc 3 in next ch 2 space, dc 3 in next ch 2 space, (tr 3 + ch 2 + tr 3) in next ch 2 space this will form our 3rd corner, dc 3 in next ch 2 space, hdc 3 in next ch 2 space, dc 3 in next ch 2 space, (tr 3 + ch 2) in next ch 2 space and slst to the top of ch 4 from beginning, this will finish our 4th corner and round
Round 5: Ch 3 (counts as 1st st), dc 1 in to next 14 st to next ch 2 space, *(dc2+ch2+dc2) in ch 2 space to form the corner, dc 1 in next 15 st, repeat from * around, finish with (dc2+ch2=Dc2 in last corner, slst to ch 3 from the beginning
Do you want to save this post for later? Pin it!
Finishing
Block the finished square. Secure the yarn, weave in the ends, and cut the yarn.
Did you try this Pattern? Share a picture
Tag me on Instagram
@sandrastitchesil
Want more crochet bag patterns?
24 Crochet Bag Patterns
DISCLOSURE
AMAZON ASSOCIATES: Sandra Stitches is a participant in the Amazon Services LLC Associates Program, an affiliate advertising program designed to provide a means for sites to earn advertising fees by advertising and linking to Amazon.com.
This post contains links to products that I use and recommend, If you purchase any using my links I get a very small fee at no ad to you! Thank you for supporting my small biz!
