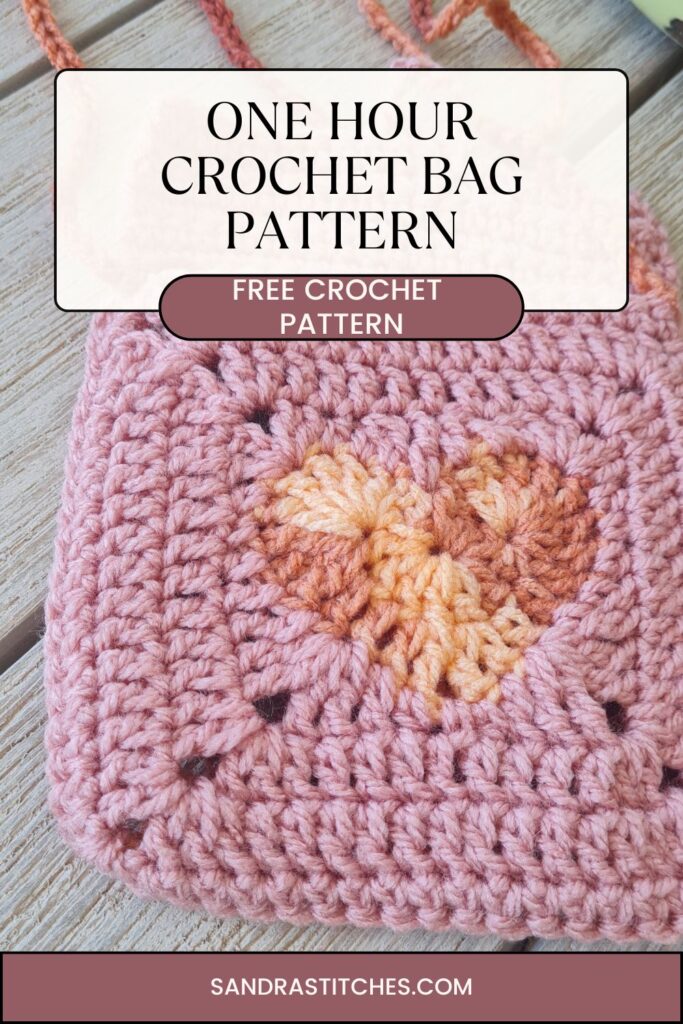
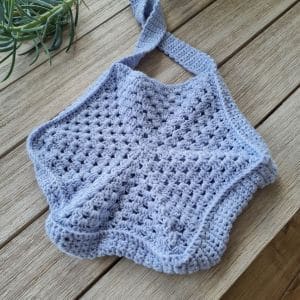
What about a heart square crochet bag pattern? You know, a cute little heart-shaped crochet square that becomes a small bag you can carry anywhere?
Well, this is it!
I love this pattern, look how the color changes of the yarn give the pattern so much depth.
Not to mention it is a great Valentine’s gift, for anyone you love! and a great add to your craft shows best sellers
Are you with me?
There are 2  ways to get this pattern:

Option 1: You can purchase the individual pattern as an easy-to-read, print-friendly PDF  from Ravelry

Option 2: Scroll down to get the written instructions for this pattern for free
Adapting the Heart-Square Crochet Bag Pattern for All Ages?
The heart-shaped square crochet bag pattern offers surprising versatility, adapting beautifully for different age groups. What begins as a simple project can evolve into countless variations, perfect for gifting or selling to a diverse audience.
For children’s versions, bright colors and playful embellishments are key. Consider using variegated yarns in primary colors or pastels, and add fun touches like crocheted flowers, small pom-poms, or animal-shaped buttons.
Teenage styles call for trendier options. Experiment with metallic yarns, bold color blocking, or even glow-in-the-dark threads. Attachable patches or a space for pin collections can add a personalized touch that appeals to this age group.
Adults often appreciate more refined versions. A bag in deep, jewel-toned cotton yarn paired with a sleek metal chain strap elevates the design for evening wear or professional settings. Subtle texture changes or elegant closures can add sophistication.
This single pattern can transform to suit anyone from 5 to 95.
I’d love to hear how you might adapt this pattern for someone in your life. Share your ideas in the comments below!
You will find instructions in the free pattern below ⬇️
** Some of the links in this post may include affiliate links. Purchasing one of these links pays me a small referral fee at no added cost to you. These small fees add up and help me keep the blog running. View our Disclosure and Privacy Policy for more information.
Before you get started, check out my Favorite Crochet Tools (affiliate)
Yarn Winder – a perfect crochet accessories
Neck Stretcher – to keep you without neck and back pain
Gauge Ruler – so you always get the right size
Pattern Designed By: Sandra Stitches This pattern is copyright protected; it is unlawful to distribute this pattern in any form (free, sale or trade).
▶️ Add this pattern to your Ravelry favorites here
Let’s get to the pattern, shall we? Making the All My Heart Bag

Materials
Alize Klasik Burcum, 100 gr, 100% Premium Acrylic. 210 meter / 230 yards, Total use of 38 grams, 87 yards
Or any weight #4 yarn

Hook: US Size (4.5 mm)
Yarn Needle, Scissors, Measuring Tape
Gauge
- Not relevant
Sizes
- Each square is 6” X 6”
Stitch Key
- Ch = Chain
- Sc = Single Crochet
- St = Stitch
- Dc = Double Crochet
- Tr = Treble crochet
- Yo = Yarn over
- INC = Increase round
- Slst = Slip stitch
Specialty Stitch
Dc2Tog = Double Crochet 2 together
(Yo, insert hook into stitch indicated, pull up a loop, yo, draw through 2 loops (first leg made), yo, insert hook into next stitch indicated, draw up a loop, yo, pull through 2 loops (second leg made), yo, pull through all 3 loops on hook)
Notes
- This pattern is written in US terminology
- This pattern is worked in rounds
- Ch 3 does count as st at the beginning of each round
- Ch1 at the beginning of the row does not count as a stitch
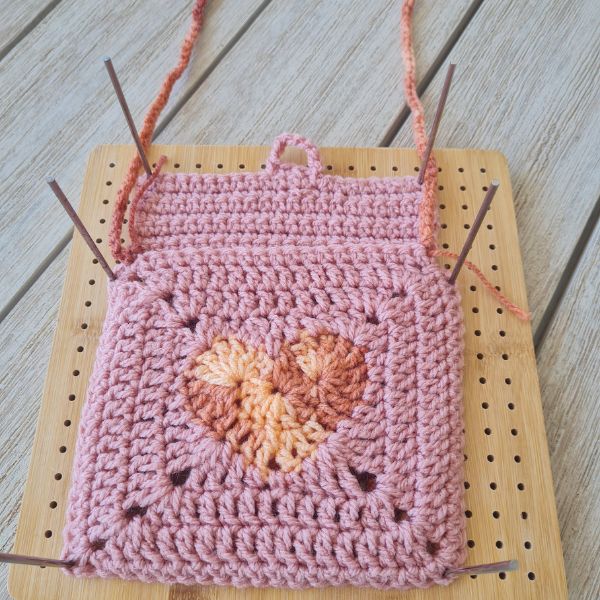
- This pattern consists of two identical squares and a strap
- I used multiple colors for a more vibrant style. You can choose a solid color or more.
Instructions
The Heart Square
Make two Squares( change colors as you wish)
Start with the heart
Chain 4, Slst to 1st ch to form a circle or use the magic circle method
Round 1: Ch 3, Dc 11 more st into the circle, Slst to Ch 3 to close the round (12)
Round 2: Skip 2 st from hook, Tr 8 in next st, dc 1 in next 2 st, (dc 1+tr1) in next st, ch 1, (tr1+dc 1) in next st, dc 1 in next 2 st, tr 8 in next st, skip 2 st and slst between 1st and last st from round 1
This is the heart- if you want to change colors ( recommended) fasten off and cut your yarn
Now we start the square around the heart
Round 3: Attach new yarn to 4th tr st , Ch 3 (counts as st), dc 1 in same st, hdc 1 in next st, sc 1 in next st, hdc 1 in next st, dc 1 in next st, tr 1 in next st,( tr 2 + ch 2 + tr 2) in next st (corner), dc 1
in next st, hdc 1 in next st, sc 1 in ch 1 space at the bottom of the heart, hdc 1 in next st, dc 1 in next st, ( tr 2 + ch 2 + tr 2) in next st (corner), tr 1 in next st, dc 1 in next st, hdc 1 in next st, sc 1 in next st, hdc 1 in next st, (dc 2 + ch 2+dc 2) in next st (corner), hdc 1 in next st, dc2tog over next 2 st, tr 1 in space we slst (between last and 1st st from prev round), dc2tog over next 2 st, hdc 1 in next st, dc 2 +ch2 in next st where we started to complete the last corner, slst to top of ch 3 from beginning.
Round 4: Ch 3 (counts as 1st st, dc 1 into the ch 1 space back, dc 1 into each of 9 st to next corner, (dc 2+ch2+dc2) in ch 2 space, dc 1 in next 9 st, (dc 2+ch2+dc2) in ch 2 space, dc 1 in next 9 st, (dc 2+ch2+dc2) in ch 2 space, dc 1 in next 9 st, dc 2+ch 2 in next ch 2 space and slst to ch3
You should have 13 st on each side of the square with ch 2 on the corners
Round 5: Ch 3 (counts as 1st st, dc 1 into the ch 1 space back, dc 1 into each of 13 st to next corner, (dc 2+ch2+dc2) in ch 2 space, dc 1 in next 13 st, (dc 2+ch2+dc2) in ch 2 space, dc 1 in next 13 st, (dc 2+ch2+dc2) in ch 2 space, dc 1 in next 13 st, dc 2+ch 2 in next ch 2 space and slst to ch3
I stopped here for a small bag- you can continue increasing the rounds for a larger square
Round 6: Ch1 ( does not count as st, sc 1 in 1st st, sc 1 in every st around, (sc 1+ch1+sc1) in each ch2 corner space.
Do you want to save this post for later? Pin it!
Construction
Using a 4 mm hook and single crochet stitches, join the squares on three sides, facing the right side out.
Continue on the open side, sc 1 on every st, (17 st), ch 1, and turn work and work 5 sc rows to form the closure.
On the 6th row find your middle st and ch10’ slst to same st and continue sc 1 to end of row, fasten off and cut your yarn
Strap
I used a simple ch strap attaching it to both sides of the bag. Any length you wish
Finishing
Block the finished bag for more straight squares. Secure the yarn, weave in the ends, and cut the yarn.

Did you try this Pattern? Share a picture
Tag me on Instagram
@sandrastitchesil
Want more crochet bag patterns?
DISCLOSURE
AMAZON ASSOCIATES: Sandra Stitches is a participant in the Amazon Services LLC Associates Program, an affiliate advertising program designed to provide a means for sites to earn advertising fees by advertising and linking to Amazon.com.
This post contains links to products that I use and recommend, If you purchase any using my links I get a very small fee at no ad to you! Thank you for supporting my small biz!