The Crochet Cable Scarf Pattern sounds complicated and scary! I know!!!
But I can assure you it is not!
With a bit of patience and slowing down you are in for a great adventure!
The magic of crochet cables lies in their clever construction – you’ll temporarily pass over certain stitches, only to come back and work into them later.
This technique creates those lovely twisted, braided textures in your fabric. The process often involves working around the post (or body) of stitches to achieve this effect.
Are you with me?
There are 2  ways to get this pattern:

Option 1: You can purchase the individual pattern as an easy-to-read,ad-free, print-friendly PDF  from Ravelry

Option 2: Scroll down to get the written instructions for this pattern for free
Why You’ll Love Crochet Cables Scarf Pattern?
Can we just take a moment to talk about the absolute magic of crochet cables?
I’m telling you, these gorgeous twists and turns are total game-changers for your projects! You know those beautiful rope-like patterns that make people go “Wow, did you really make that?” – yep, those are cables, and trust me, they’re not as tricky as they look!
Think of cables as your secret weapon for taking your crochet from “nice” to “OH MY GOODNESS, WHERE DID YOU GET THAT?”
Unlike knitted cables (which, let’s be honest, can be a bit fiddly with those extra needles), crochet cables are all about working your post stitches in a clever way to create that stunning dimensional effect.
Want to know the best part? You can pop these beautiful twists onto just about anything:
- That sweater you’ve been dreaming about making? Yes!
- The cushion cover that need some oomph? Absolutely!
- A cozy scarf that’ll make everyone jealous? You bet!
- A show-stopping blanket? Oh my word, YES!
- Even a quick headband project? Go for it!
Here’s what I love most about cables – they’re like a choose-your-own-adventure in crochet!
And don’t even get me started on how different they look in various yarns
Ready to give them a try? Trust me, once you get the hang of the basic “skip and work back” dance, you’ll be absolutely hooked!
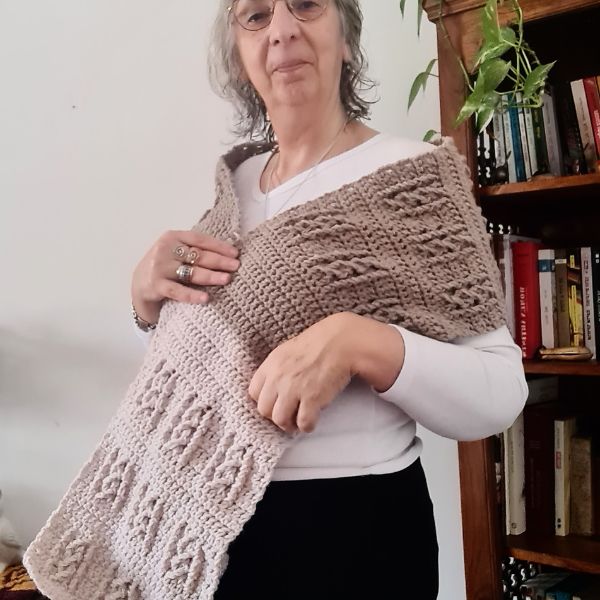
You will find instructions in the free pattern below ⬇️
** Some of the links in this post may include affiliate links. Purchasing one of these links pays me a small referral fee at no added cost to you. These small fees add up and help me keep the blog running. View our Disclosure and Privacy Policy for more information.
Before you get started, check out my Favorite Crochet Tools (affiliate)
Yarn Winder – a perfect crochet accessories
Neck Stretcher – to keep you without neck and back pain
Gauge Ruler – so you always get the right size
Pattern Designed By: Sandra Stitches This pattern is copyright protected; it is unlawful to distribute this pattern in any form (free, sale or trade).
▶️ Add this pattern to your Ravelry favorites here
Let’s get to the pattern, shall we? Making the Granny Hexagon Slippers Socks

Materials for the cable scarf
Ice Yarns Saver (aran #4), 100% Dralon Acrylic, 200gr, 330mt a skein, for this sample I used 2 skeins , one of each color
( Please take a look at yardage)

Hook: US Size (6 mm)
Yarn Needle, Scissors, Measuring Tape
Gauge
- 14 st X 9 rows (cables pattern)
Sizes
- This sample is 9.5” X 72”
Stitch Key
- Ch = Chain
- Sc = Single Crochet
- Dc = Double Crochet
- Hdc = Half Double Crochet
- Tr = Treble Crochet
- Fptr = Front Post Treble Crochet
- St = Stitch
Specialty Stitches
Front Post Treble Crochet = Yo twice, working on the side of the project facing, insert the hook around the post from front to back and then to front again, yo, pull up a loop, (yo, pull through 2 loops on hook) 3 times.
Watch the Croche Cable Scarf Pattern Video Tutorial
Notes
- This pattern is written in US terminology
- This pattern is worked in rows
- This pattern uses rows of repeat
- Ch3 does count as 1st DC at the beginning of the row
- You can work this pattern with one color or multiple as you wish. I used two colors- changed colors as I wished – you can too
- This pattern calls for a multiple of 8+4

Instructions
Chain 27+1
Row 1:Sc 1 in 2nd ch from hook, sc 1 in next and across to end of row, turn work (27)
Row 2:Ch3,dc1 in next st and across to end of row, turn work (27)
Row 3:Ch 1, sc1 in 1st st from hook, sc 1 in next st and across to end of row, turn work (27)
Row 4: Ch3, dc 1 in next 2 st, *[fptr (over dc from 2 rows below) in next st, skip next st, fptr in next 2 st, fptr in skipped st, dc 1(in actual row) in next 3 st]*, repeat from *to* to a total of 3, finish with dc 1 in last 3 st, turn work (27)
Row 5: Ch 1, sc1 in 1st st from hook, sc 1 in next st and across to end of row, turn work(27)
Row 6: Ch3, dc 1 in next 2 st, *[fptr (over fptr from 2 rows below) in next st, skip next st, fptr in next 2 st, fptr in skipped st, dc 1(in actual row) in next 3 st]*, repeat from *to* finish with dc 1 in last 3 st, turn work (27)
Now we repeat
Row 7+8: Repeat rows 5+6
Row 9: Ch 1, sc1 in 1st st from hook, sc 1 in next st and across to end of row, turn work (27)
Row 10: Ch 3, dc 1 in next st, dc 1 across to end of row, turn work (27)
Row 11: Ch 1, sc1 in 1st st from hook, sc 1 in next st and across to end of row, turn work (27)
Row 12: Ch 3, dc 1 in next st, dc 1 across to end of row, turn work (27)
Row 13: Ch 1, sc1 in 1st st from hook, sc 1 in next st and across to end of row, turn work (27)
Rows: 14-29: repeat rows 4-13 twice
Row 30: Ch 3, dc 1 in next st, dc 1 across to end of row, turn work (27)
Row 31: Ch 1, sc1 in 1st st from hook, sc 1 in next st and across to end of row, turn work (27)
Rows 32-45: repeat rows 30+31 and change colors if you wish
Again we repeat
Rows 46-129: repeat rows 4-45 twice
Row 130: Ch3, dc 1 in next 2 st, *[fptr (over dc from 2 rows below) in next st, skip next st, fptr in next 2 st, fptr in skipped st, dc 1(in actual row) in next 3 st]*,repeat from *to* finish with dc 1 in last 3 st, turn work (27)
Row 131: Ch 1, sc1 in 1st st from hook, sc 1 in next st and across to end of row, turn work(27)
Row 132: Ch3, dc 1 in next 2 st, *[fptr (over fptr from 2 rows below) in next st, skip next st, fptr in next 2 st, fptr in skipped st, dc 1(in actual row) in next 3 st]*, repeat from *to* finish with dc 1 in last 3 st, turn work (27)

And last time repeat
Row 133+134: Repeat rows 5+6
Row 135: Ch 1, sc1 in 1st st from hook, sc 1 in next st and across to end of row, turn work (27)
Row 136: Ch 3, dc 1 in next st, dc 1 across to end of row, turn work (27)
Row 137: Ch 1, sc1 in 1st st from hook, sc 1 in next st and across to end of row, turn work (27)
Row 138: Ch 3, dc 1 in next st, dc 1 across to end of row, turn work (27)
Row 139: Ch 1, sc1 in 1st st from hook, sc 1 in next st and across to end of row, turn work (27)
Do you want to save this post for later? Pin it!
Finishing
Cut the yarn and weave in ends,
You can add tassels or fringe to the scarf as you wish
Did you try this Pattern? Share a picture
Tag me on Instagram
@sandrastitchesil
Want more scarve patterns?
DISCLOSURE
AMAZON ASSOCIATES: Sandra Stitches is a participant in the Amazon Services LLC Associates Program, an affiliate advertising program designed to provide a means for sites to earn advertising fees by advertising and linking to Amazon.com.
This post contains links to products that I use and recommend, If you purchase any using my links I get a very small fee at no ad to you! Thank you for supporting my small biz!
**This is an original Sandra Regev pattern: Owner /Designer of Sandra Stitches. This pattern may not be redistributed for free, sale, or trade, but finished products can be sold with credit to this shop – enjoy!


