Looking for a crochet stitch that’s simple, versatile, and packed with texture? The esasy pebble stitch might be exactly what you need!
Great for everything from blankets and sweaters to scarves and tops, this stitch is both easy to learn and satisfying to work on.
With just a two-row repeat, it’s beginner-friendly and makes any project stand out. Let’s walk through the steps to master this stitch and explore its creative possibilities.
Get Creative!
Do you want to save this post for later? Pin it 👇

What You’ll Need
Before you start, gather the following materials:
- Yarn: A medium-weight yarn (#4) works well. In this tutorial, a 100% acrylic yarn in a peach shade was used for better visibility.
- Hook: A 5mm crochet hook is recommended for this yarn weight, but feel free to adjust based on your project and yarn type.
Now that you’ve got your tools, let’s get started!
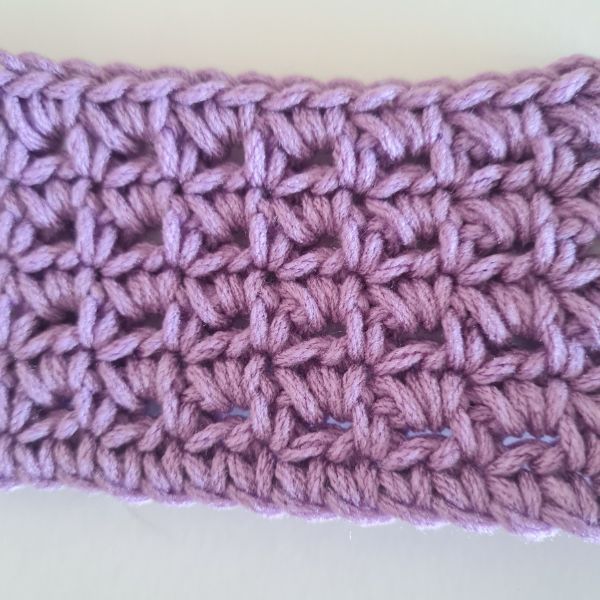
Understanding the Pebble Stitch
The pebble stitch is stitched in multiples of four plus two. This means you’ll first calculate the length of your foundation chain and then add an extra two chains at the end. If you’re unsure about the size, you can always practice with a smaller swatch before taking on a full project.
Here are the key features of this stitch:
- It involves a combination of puff stitches and single crochets.
- Each puff stitch creates a “pebble” or bubble-like texture that pops beautifully.
- With just two rows to repeat, it’s easy to remember and quick to work up!
Watch the step by step video tutorial below 👇
Step-by-Step Instructions
Foundation Chain
- Make a foundation chain in multiples of 4, then add 2 additional chains.
- For example, if you want 16 stitches across, chain 16 (4×4) and add 2 more (total: 18 chains).
Row 1: Single Crochet Row
- Work a single crochet into the second chain from the hook (the first chain counts as the turning chain and is skipped).
- Continue making single crochets across your foundation chain.
- At the end of the row, chain 1 and turn your work.
Row 2: Puff and Single Crochet
- Start with a single crochet in the first stitch.
- To make the puff stitch:
- Yarn over and insert your hook into the next stitch, then pull up a loop. Repeat this two more times (a total of three yarn-overs and inserts).
- You’ll now have seven loops on your hook. Yarn over once more and pull through all seven loops.
- Do not chain after the puff stitch. Instead, make a single crochet in the next stitch to secure it.
- Alternate between puff stitches and single crochets across the row.
- At the end of the row, finish with one single crochet.
- Chain 1 and turn your work for the next row.
Row 3: Single Crochet Row
- Work a single crochet into each stitch across the row, ensuring you crochet both:
- On top of each puff stitch.
- In the single crochet spaces between puff stitches.
- Finish with a single crochet in the last stitch.
Repeat Row 2 and Row 3 for the entire project.
Pebble Crochet Stitch Video Tutorial
Customizing the Pebble Stitch
Aligned vs. Alternating Pebbles
Want to mix things up? You can either:
- Align your puffs by keeping them stacked on top of each other row after row.
- Alternate your puffs by shifting them to sit between the puffs from the row below.
To alternate, simply add an extra single crochet at the start of your puff row. This slight offset creates a staggered effect, giving your project a more dynamic and textured appearance.
Project Ideas
The pebble stitch works well for projects ranging from large blankets to small accessories. Here’s some inspiration:
- Blankets: Add warmth and texture to your living space.
- Scarves: Make cozy accessories with extra flair.
- Sweaters and Tops: Use the stitch for panels or as an all-over design.
- Baby Clothes: Its softness and texture are perfect for little ones.
Before you get started…
Check out my Favorite items and tools
Rechargeable LED night reading light on Amazon
Bamboo Hooks on Amazon
Colorful Bobby pins as crochet markers on Amazon
Tips for Success
- Work with the right yarn: A smooth yarn makes it easier to see your stitches. Avoid fuzzy or novelty yarns until you’re comfortable.
- Mind your tension: Keep an even pull on the yarn for neat and consistent puffs.
- Practice with a swatch: If you’re unfamiliar with puff stitches, practicing on a smaller piece can be helpful.
Why You’ll Love the Pebble Stitch
This stitch is great for beginners and seasoned crocheters alike. Its simplicity makes it relaxing to work on, while the texture adds depth to your projects. Plus, with customization options, you can create endless variations to suit your designs.
Final Thoughts
The pebble stitch is proof that even the simplest patterns can be beautiful and versatile. Whether you’re making a cozy throw or a lightweight top, this stitch brings character and texture to the table. Give it a try, experiment with alternating patterns, and let your creativity shine. Happy crocheting!
Love This Pattern? There’s More Where That Came From!
You will discover my complete collection of crochet patterns, tutorials, and resources, both free and premium all in one convenient place.
I know you’ll find something to inspire your next project🙃
All Things Crochet Start Here →
Want more stitch tutorials:
Click here to share your finished project with our community!
A new stitch steps
- When learning a new stitch, try several yarn weights and hook sizes to understand how the stitch works and looks.
- Use light yarn colors to get the stitch to form the right shape.
- Make several swatches before starting a new project
Stay Calm and Crochet!😎
Sandra
Interested in a professional Paperback Crochet Planner?
DISCLOSURE
AMAZON ASSOCIATES: Sandra Stitches is a participant in the Amazon Services LLC Associates Program, an affiliate advertising program designed to provide a means for sites to earn advertising fees by advertising and linking to Amazon.com.
This post contains links to products that I use and recommend, If you purchase any using my links I get a very small fee at no ad to you! Thank you for supporting my small biz!
