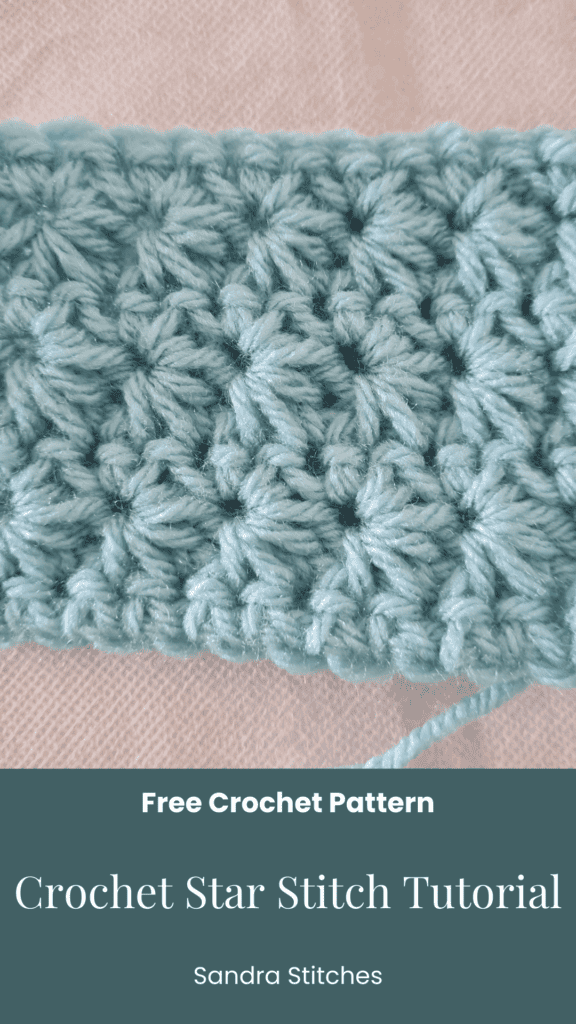
Easy and Beautiful Crochet Star Stitch Tutorial
Looking for a gorgeous crochet stitch that’s surprisingly simple once you get the hang of it? The crochet star stitch might just become your new favorite.
With its unique texture and design, it adds elegance to any project, from blankets to scarves.
Don’t be intimidated by how intricate it looks—this stitch only requires a two-row repeat, making it accessible even for beginners who are comfortable with basic techniques.
In this guide, I’ll walk you through how to create the star stitch step by step, ensuring you can confidently incorporate it into your projects.
What You’ll Need
Before getting started, let’s gather our materials:
- Yarn: I used Signet Chunky yarn, which fits between a #4 medium and #5 bulky weight.
- Hook: A 6 mm hook works perfectly with this yarn.
- Preparation: For this stitch, your foundation chain needs an even number of stitches.
Once you’ve chosen your yarn and hook, calculate the number of stitches you’ll need based on the size of your project and create an even-number foundation chain. Ready to dive in?
** Some of the links in this post may include affiliate links. Making a purchase through one of these links pays me a small referral fee at no added cost to you. These small fees add up and help me keep the blog running. View our Disclosure and Privacy Policy for more information.
Before you get started…
Check out my Favorite items and tools
Rechargeable LED night reading light on Amazon
Bamboo Hooks on Amazon
Colorful Bobby pins as crochet markers on Amazon
Want to save this post for later? Go ahead and PIN IT!
Starting with a Single Crochet Foundation
Begin by making a foundation chain with an even number of stitches. Let’s say you chain 16 stitches.
- Start your first row with a single crochet: Insert your hook into the second chain from the hook and make a single crochet.
- Continue placing one single crochet in each chain across your row.
- When you’re done, you should have an odd number of single crochet stitches, thanks to skipping that first chain. This row forms the base for the star stitch pattern.
This foundation row isn’t part of the two-row repeat but helps give your project a polished start.
Making the Star Stitch (Row 1 of the Repeat)
The magic of the crochet star stitch starts here. Follow these steps carefully:
- Chain three and turn your work.
- From the second chain in the turning chain, insert your hook and pull up a loop. Continue pulling up loops from:
- The first chain in the turning chain.
- The first stitch where the chain 3 begins.
- The next two stitches in the row.
- You should now have six loops on your hook.
- Yarn over and pull through all six loops. Chain one to secure your first star. This chain is the “eye” of the star, which you’ll refer back to later.
- For the next star:
- Insert your hook into the eye of the previous star and pull up a loop.
- Pull up loops from the last vertical bar of the previous star stitch.
- Pull up loops from the same stitch where the last star ended.
- Pull up loops from the next stitch and the following stitch. You should now have six loops on your hook.
- Yarn over, pull through all six loops, and chain one.
- Repeat this process across the row. When you reach the final stitch, finish the row with a half double crochet.
Congratulations! You’ve just completed your first star stitch row.
The Single Crochet Row (Row 2 of the Repeat)
The next row is a simple single crochet row with a slight twist. Here’s how to work it:
- Chain one and turn your work.
- Place one single crochet at the top of the half double crochet from the previous row.
- Add:
- One single crochet into the eye of the first star.
- Two single crochets into each eye of the stars across the row.
- End with a single crochet in the final stitch.
This row reinforces the texture of the star stitch and preps it for the next star row.
Putting It All Together
The crochet star stitch is built on a two-row pattern repeat:
- Row 1: Star stitch row.
- Row 2: Single crochet row.
By alternating these two rows, you can create a beautiful, textured fabric perfect for cozy projects.
Pro Tip: Yarn Management
The star stitch uses more yarn than some simpler stitches, so be sure to calculate your yardage if you’re planning a larger project like a blanket.
Watch the Crochet Star Stitch Tutorial
Common Mistakes to Avoid
- Skipping an eye: Always insert your hook directly into the eye of the star for precise placement.
- Not counting your loops: Each star should always start with six loops on your hook before yarning over and pulling through.
Taking your time in the beginning will help avoid errors later on.
Why You’ll Love the Star Stitch
The crochet star stitch is visually stunning yet straightforward once you understand the basics. It works beautifully for blankets, winter accessories, or even textured pillows. Its versatility and charm make it worth learning for crocheters of any level.
Ready to Crochet Your Next Project?
Now that you’ve mastered the steps for the crochet star stitch, you can confidently add a touch of elegance to your projects. Grab your yarn, hook, and a bit of patience—your next cozy creation awaits!
Looking for more inspiration? Check out Sandra’s pattern collection on Ravelry and join her Facebook group for challenges, free patterns, and more.
Don’t forget to share your creations in the comments below. Happy crocheting!
Love This Pattern? There’s More Where That Came From!
You will discover my complete collection of crochet patterns, tutorials, and resources, both free and premium all in one convenient place.
I know you’ll find something to inspire your next project🙃
All Things Crochet Start Here →
A new stitch steps
- When learning a new stitch, try several yarn weights and hook sizes to understand how the stitch works and looks.
- Use light yarn colors to get the right formation of the stitch.
- Make several swatches before starting a new project
Stay Calm and Crochet!😎
Sandra
DISCLOSURE
AMAZON ASSOCIATES: Sandra Stitches is a participant in the Amazon Services LLC Associates Program, an affiliate advertising program designed to provide a means for sites to earn advertising fees by advertising and linking to Amazon.com.
This post contains links to products that I use and recommend, If you purchase any using my links I get a very small fee at no ad to you! Thank you for supporting my small biz!


4 thoughts on “How to Crochet the Star Stitch”