Looking for a crochet project that’s as beautiful as it is practical?
You’re in luck, because I’ve got an amazing Free Triangle Shawl Crochet Pattern tutorial just for you!
This pattern is perfect for anyone who loves to create beautiful things with their own two hands.
You will create a one-of-a-kind accessory that’s perfect for any season.
Best of all, this pattern won’t cost you a dime! So if you’re looking for a fun and rewarding project that won’t break the bank, this is it.
So grab your crochet hook, and your favorite yarn, and let’s get started on creating a beautiful Triangle Shawl that you’ll be proud to wear or gift to someone special.
Find the free pattern below or purchase the ad-free PDF version of this pattern on Ravelry. The PDF is designed for printing and this way you can support me!
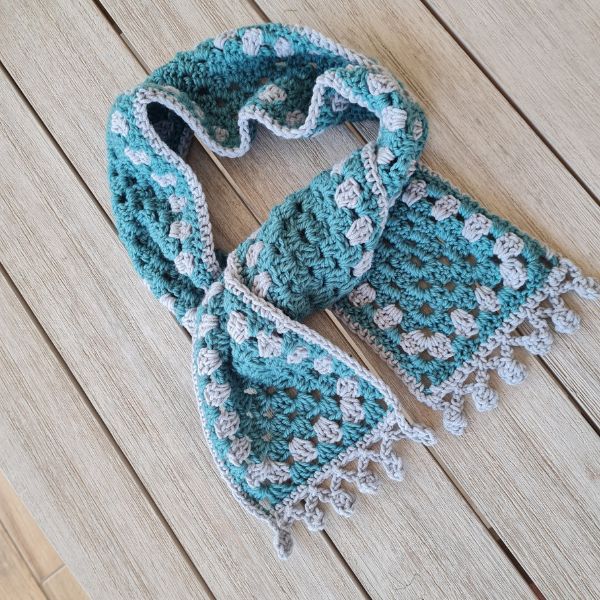
How to Style a Triangle Shawl
Once you’ve finished crocheting your beautiful triangle shawl, the next step is figuring out how to style it.
Luckily, this versatile accessory can be worn in so many different ways, making it a perfect addition to any wardrobe.
One of the most popular ways to wear a triangle shawl is to simply drape it over your shoulders. This is a classic look that works for both casual and dressy occasions.
For a more formal look, try wrapping one end of the shawl around your neck and letting the other end hang down your back. This will create a sophisticated, draped look that’s perfect for weddings and other special events.
If you’re looking for a more bohemian vibe, try tying the ends of the shawl in front of your chest. This creates a more casual, carefree look that’s perfect for festivals and outdoor gatherings.

More ideas to style your shawl:
You can also experiment with tying the ends of the shawl in different ways to create unique, eye-catching looks.
Another great way to style a triangle shawl is to wear it as a scarf. Simply fold the shawl in half diagonally, then wrap it around your neck and tie the ends together in front. This creates a cozy, layered look that’s perfect for chilly days.
No matter how you choose to wear your triangle shawl, the key is to have fun and experiment with different styles until you find the one that works best for you.
With its endless possibilities for styling, this versatile accessory is sure to become a staple in your wardrobe.

** Some of the links in this post may include affiliate links. Making a purchase through one of these links pays me a small referral fee at no added cost to you. These small fees add up and help me keep the blog running. View our Disclosure and Privacy Policy for more information.
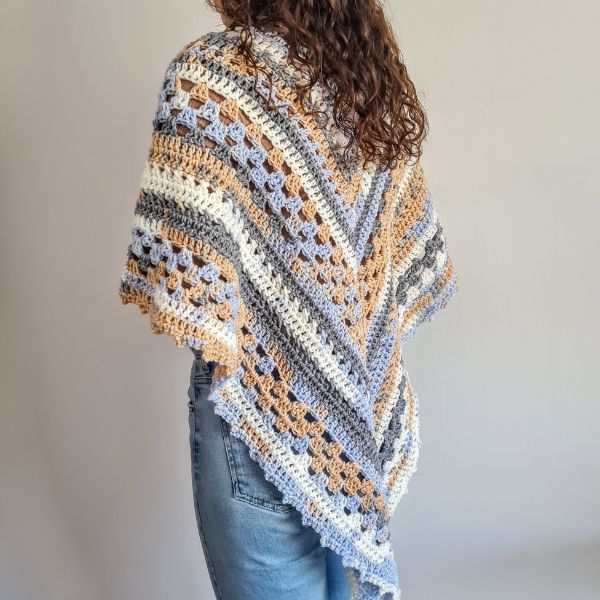
The Watermelon Shawl, The Colors!
For a watermelon-inspired shawl, consider using shades of green and vibrant pink.
The green can represent the rind of the watermelon, while the pink can represent the juicy flesh. You can choose to use these colors in a variety of ways, such as alternating between stripes of green and pink, or blending the colors together for a more gradient effect.
One of the great things about this color combination is that it works well with a variety of different outfits. Pair your watermelon shawl with a simple white dress for a fresh and summery look, or wear it over a black jumpsuit to add a pop of color and personality.
If you’re feeling daring, you can even mix and match your watermelon colors with other bold shades, such as turquoise or orange.
The possibilities are endless, so have fun experimenting and finding the perfect combination that makes you feel confident and stylish.
Overall, a watermelon-colored triangle shawl is a fun and playful addition to any wardrobe. S
o why not give it a try and see how this bold and vibrant color combination can add some extra flair to your everyday outfits?
The Pattern
SKILL LEVEL
Beginner/intermediate
SIZES/FINISHED MEASUREMENTS
One size women
YARN
Vogue with love yarn, weight #4 in the green shade (150gr)
Vogue with love yarn weight #4 in pink shade (leftovers…
Substitutions can be: Any Aran / worsted/medium weight #4
HOOK & OTHER MATERIALS
- US Size I (5.5 mm) crochet hook
- Scissors
- Yarn Needle
- Measuring Tape
GAUGE
No need it grows as you go and you can determine how big the Shawl will be
STITCH KEY
Ch = Chain, Sl St = Slip
Dc = Double Crochet
Inc = increase
Bldc = back loop double crochet
SPECIALTY STITCHES & TECHNIQUES
X Cross st : [skip 1 st,dc in next st, dc 1 in skipped st to form a cross]
NOTES
- The pattern is worked in Rows
- Beginning ch3 does count as 1st st
- Every row has an increase at the first st and the last st ( dc2 in same st)
- The center of the Shawl is made with 2dc+ ch2+ 2dc in every single row
- You can determine how large by adding rows
- This is a symmetrical triangle- you should have the same count of stitches on each part from the center
- I used two different colors here, you can choose to make this in one color or more, The changing colors is up to your yarn preferences, you can change at any row as you wish
Let’s start this Shawl!!

INSTRUCTIONS
Starting chain : ch4 and sl st to 1st ch to form a circle
Row 1: ch3 + 2dc, ch2, dc3
Row 2: ch3 and turn your work, inc ( dc1 in same 1st st from prev row), dc1 in next 2 dc , dc2 in ch space, ch2, dc2 in same ch space, dc 1, dc1, dc2 in last st(inc)
Move to Row 3: ch3 and turn your work, inc ( dc1 in same 1st st from prev row), *[dc in next 5 dc , dc2 in ch space, ch2, dc2 in same ch space]*, repeat from * to * to last st and inc
Now Row 4: ch3 and turn your work, inc ( dc1 in same 1st st from prev row), *[bldc in next 8 dc , dc2 in ch space, ch2, dc2 in same ch space]*, repeat from * to * to last st and inc
Row 5: ch3 and turn your work, inc ( dc1 in same 1st st from prev row), *[ch1, sk 1, dc 1 in next st]*, repeat from * to * 5 times, dc2 in ch space, ch2, dc 2 in same ch space and repeat from * to * 5 more times to last st and inc
Row 6: ch3 and turn your work, inc ( dc1 in same 1st st from prev row), *[dc1 in next 14 ch1+dc , dc2 in ch space, ch2, dc2 in same ch space]*, repeat from * to * to last st and inc

Take a breath 🙂
Then Row 7: ch3 and turn your work, inc ( dc1 in same 1st st from prev row), *[dc1 in next 17, dc2 in ch space, ch2, dc2 in same ch space]*, repeat from * to * to last st and inc
Row 8: ch3 and turn your work, inc ( dc1 in same 1st st from prev row), *[bldc1 in next 20 st , dc2 in ch space, ch2, dc2 in same ch space]*, repeat from * to * to last st and inc
Row 9: ch3 and turn your work, inc ( dc1 in same 1st st from prev row), *[ch1, sk 1, dc 1 in next st]*, repeat from * to * 11 times, dc2 in ch space, ch2, dc 2 in same ch space and repeat from * to * 11 more times to last st and inc ( you should have a total of 12 windows on each side.
Continue withRow 10: ch3 and turn your work, inc ( dc1 in same 1st st from prev row), *[dc in next 26 ch1+dc , dc2 in ch space, ch2, dc2 in same ch space]*, repeat from * to * to last st and inc
Row 11: ch3 and turn your work, inc ( dc1 in same 1st st from prev row), *[sk1 st, dc1 in next , dc in skipped st (Cross st) 14 times]*, dc1 in next st , dc2 in ch space, ch2, dc2 in same ch space, dc1 in next st, , repeat from * to * to last st and inc
Row 12: ch3 and turn your work, inc ( dc1 in same 1st st from prev row), *[dc1 in next 32 st, dc2 in ch space, ch2, dc2 in same ch space]*, repeat from * to * to last st and inc
And now Row 13: ch3 and turn your work, inc ( dc1 in same 1st st from prev row), *[dc1 in next 35, dc2 in ch space, ch2, dc2 in same ch space]*, repeat from * to * to last st and inc
Want to save this post for later? Pin it!
Continue the Rows…..
Row 14: ch3 and turn your work, inc ( dc1 in same 1st st from prev row), *[bldc1 in next 38st , dc2 in ch space, ch2, dc2 in same ch space]*, repeat from * to * to last st and inc
Row 15: ch3 and turn your work, inc ( dc1 in same 1st st from prev row), *[ch1, sk 1, dc 1 in next st]*, repeat from * to * 20 times, dc2 in ch space, ch2, dc 2 in same ch space and repeat from * to * 21 more times to last st and inc ( you should have a total of 21 windows on each side.
Work Row 16: ch3 and turn your work, inc ( dc1 in same 1st st from prev row), *[dc in next 44 ch1+dc , dc2 in ch space, ch2, dc2 in same ch space]*, repeat from * to * to last st and inc
Row 17: ch3 and turn your work, inc ( dc1 in same 1st st from prev row), *[sk1 st, dc1 in next , dc in skipped st (Cross st) 23 times]*, dc1 in next st , dc2 in ch space, ch2, dc2 in same ch space, dc1 in next st, , repeat from * to * to last st and inc
And Row 18: ch3 and turn your work, inc ( dc1 in same 1st st from prev row), *[dc1 in next 50 st, dc2 in ch space, ch2, dc2 in same ch space]*, repeat from * to * to last st and inc
Row 19: ch3 and turn your work, inc ( dc1 in same 1st st from prev row), *[dc1 in next 53 st, dc2 in ch space, ch2, dc2 in same ch space]*, repeat from * to * to last st and inc
Row 20: ch3 and turn your work, inc ( dc1 in same 1st st from prev row), *[bldc1 in next 56 st , dc2 in ch space, ch2, dc2 in same ch space]*, repeat from * to * to last st and inc
It goes on….
Now to Row 21: ch3 and turn your work, inc ( dc1 in same 1st st from prev row), *[ch1, sk 1, dc 1 in next st]*, repeat from * to * 29 times, dc2 in ch space, ch2, dc 2 in same ch space and repeat from * to * 29 more times to last st and inc ( you should have a total of 30 windows on each side.
Row 22: ch3 and turn your work, inc ( dc1 in same 1st st from prev row), *[dc in next 62 ch1+dc , dc2 in ch space, ch2, dc2 in same ch space]*, repeat from * to * to last st and inc
Row 23: ch3 and turn your work, inc ( dc1 in same 1st st from prev row), *[dc1 in next 65 st , dc2 in ch space, ch2, dc2 in same ch space]*, repeat from * to * to last st and inc
And on….
Continue with Row 24: ch3 and turn your work, inc ( dc1 in same 1st st from prev row), *[ch1, sk 1, dc 1 in next st]*, repeat from * to * 33 times, dc2 in ch space, ch2, dc 2 in same ch space and repeat from * to * 33 more times to last st and inc ( you should have a total of 34 windows on each side.
Row 25: ch3 and turn your work, inc ( dc1 in same 1st st from prev row), *[dc in next 71 ch1+dc , dc2 in ch space, ch2, dc2 in same ch space]*, repeat from * to * to last st and inc
Row 26: ch3 and turn your work, inc ( dc1 in same 1st st from prev row), *[sk1 st, dc1 in next , dc in skipped st (Cross st) 37times]*, dc1 in next st , dc2 in ch space, ch2, dc2 in same ch space, dc1 in next st, , repeat from * to * to last st and inc
Work Row 27: ch3 and turn your work, inc ( dc1 in same 1st st from prev row), *[dc1 in next 77 st , dc2 in ch space, ch2, dc2 in same ch space]*, repeat from * to * to last st and inc
Row 28: ch3 and turn your work, inc ( dc1 in same 1st st from prev row), *[bldc1 in next 80 st , dc2 in ch space, ch2, dc2 in same ch space]*, repeat from * to * to last st and inc
And more Rows……
Row 29: ch3 and turn your work, inc ( dc1 in same 1st st from prev row), *[ch1, sk 1, dc 1 in next st]*, repeat from * to * 41 times, dc2 in ch space, ch2, dc 2 in same ch space and repeat from * to * 33 more times to last st and inc ( you should have a total of 42 windows on each side.
Row 30: ch3 and turn your work, inc ( dc1 in same 1st st from prev row), *[dc1 in next 86 st , dc2 in ch space, ch2, dc2 in same ch space]*, repeat from * to * to last st and inc
Getting to Row 31: ch3 and turn your work, inc ( dc1 in same 1st st from prev row), *[sk1 st, dc1 in next , dc in skipped st (Cross st) 44times]*, dc1 in next st , dc2 in ch space, ch2, dc2 in same ch space, dc1 in next st, , repeat from * to * to last st and inc
I finished in the next row but you can continue repeating rows and make this Shawl larger!
Lastly Row 32: ch1 and turn your work, sc in 1st st from hook. Sc1 in each and every st across to the center of your shawl, sc2+dc2+sc2 in ch space and continue sc1 to end of row
To finish, cut and fasten your yarn. Weave in ends using a tapestry needle.
You can add Fringes or Tassels!
DONE!!
Copyright protected. You may not redistribute pattern after purchase or publish any part as your own including photos. If sharing online you must link back to this original post. You may sell finished products and if possible, reference back to this pattern and/or give credit to Sandra Stitches by Sandra as the original designer.
Free ways to share and support me
- Favorite this pattern on Ravelry
- PIN on Pinterest
- Share in your story on Instagram
- Share on Facebook
Thank you so much! 🙂
Get your Ad-Free version on Ravelry
Interested in a professional Paperback Crochet Planner?
Check out my Planner on Amazon
Did you try this pattern?
Share a picture
Tag me on Instagram
@sandrastitchesil
Questions?
Ask and share in our
FREE Facebook Group
Want to know more about me? This is my story
DISCLOSURE
AMAZON ASSOCIATES: Sandra Stitches is a participant in the Amazon Services LLC Associates Program, an affiliate advertising program designed to provide a means for sites to earn advertising fees by advertising and linking to Amazon.com.
This post contains links to products that I use and recommend, If you purchase any using my links I get a very small fee at no ad to you! Thank you for supporting my small biz!


2 thoughts on “Free Triangle Shawl Crochet Pattern: The Watermelon”
Luv the shawl I am going to use it for one of my choices to choose from when I make them for friends & people. I hope to be seeing a lot more Shawls. Thank you. Kathy. ksyarnmajic4u2c2@gmail.com