Crochet Stitch for Blankets and Scarves: The slat stitch is a simple yet striking crochet stitch that adds texture and dimension to any project.
It uses front post double crochet worked in a crossed pattern, making it a super texture stitch that feels fresh and versatile. You can add it in as part of your design or make it a standout feature on its own.
If you’re looking for a fresh crochet stitch for blankets and scarves, the slat stitch is worth trying. It adds depth and interest without needing complicated steps. This post will guide you through how to work the stitch, tips on keeping your rows neat, and ideas on where to use it in your projects.
What Is the Slat Stitch?
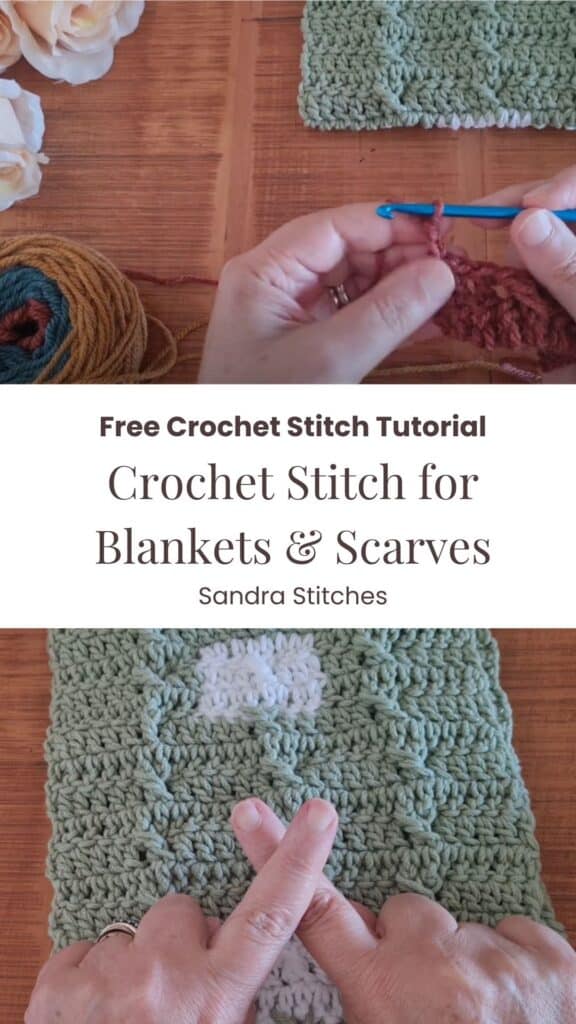
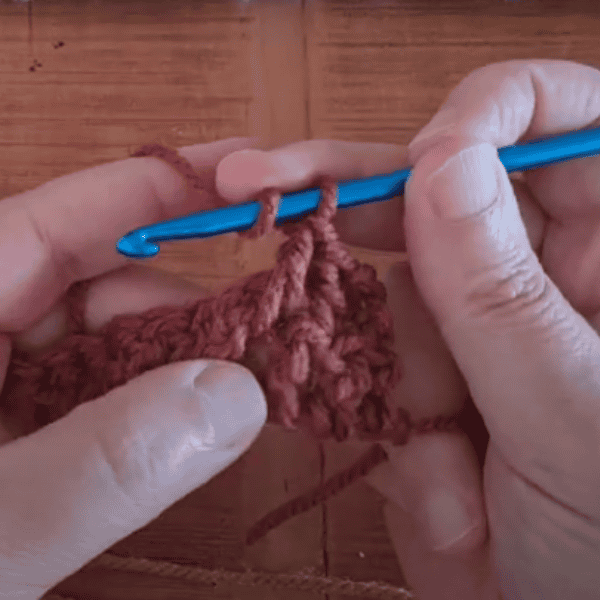
The slat stitch creates a crossed pattern on the fabric by skipping stitches and then working front post double crochet (FPDC) around those skipped stitches. This process gives the appearance of slats or raised crosses that stand out from the background.
Because you’re working around the posts of stitches from the previous row, the texture pops, which looks fantastic on scarves, blankets, and other projects where you want that extra detail.
It’s quite straightforward once you get the hang of working front post stitches. The slat stitch works in pairs, skip one stitch, work FPDC around the next, then return to crochet the skipped stitch’s post to form the cross.
Between these slat stitch crosses, you’ll work regular double crochets to keep the structure and add balance.
Here’s what makes it so handy:
- Works with your usual double crochet foundation.
- Adds visible texture without complex shaping.
- Can be combined with colorwork like tapestry crochet.
- Fits well into scarves, blankets, or any place you want a bit of raised texture.
Before you get started, check out my newest favorite finds!
Yarn Winder – a perfect crochet accessory
Neck Stretcher – to keep you without neck and back pain
Gauge Ruler – so you always get the right size
Materials and Preparation
You can use any yarn you like with the slat stitch. The video tutorial uses leftover yarn from the stash, which is a great way to use scraps and keep your projects sustainable. Color choice is flexible—lighter yarns show stitches clearly, and darker shades add richness to texture.
Just pick a crochet hook size that fits your yarn comfortably, no need for anything special.
Before starting the slat stitch, you’ll need a foundation row made entirely of double crochet stitches. This row gives the posts that the front post double crochets will work around.
Setting up your foundation row:
- Chain the number of stitches your project requires.
- Work one double crochet (dc) in each chain stitch across.
The exact number of chains depends on your project size and pattern. For example, if you want slat stitch accents every six stitches, plan your chain length accordingly.
Want to save this post for later? Go ahead and PIN IT
How to Work the Slat Stitch
Here’s a detailed step-by-step guide for creating the slat stitch:
- Start with a foundation row: Chain the number needed and work a double crochet in each chain.
- Chain two and turn: This chain two counts as the first double crochet of the next row.
- First double crochet for framing: Work a double crochet in the first stitch to give the row a neat edge.
- Skip one stitch, then work a front post double crochet around the next stitch:
- Yarn over, skip the next stitch, insert your hook from front to back around the post of the following stitch from the last row (the post is the vertical part of that stitch).
- Yarn over, pull up a loop, yarn over, pull through two loops, yarn over, pull through last two loops as usual.
- Go back to the skipped stitch and work another front post double crochet around its post:
- Insert your hook around the post of the stitch you skipped, yarn over, pull up a loop a little looser than usual to make it easier to carry your yarn over, and finish the double crochet.
- Work regular double crochets in the stitches between your slat stitches:
- For clearer texture, you might want two double crochets between each slat stitch pair. Adjust how many you add depending on your project.
- Repeat the pattern: Skip one, FPDC around next stitch, FPDC around skipped stitch, then double crochets until you reach the row’s end.
Tip: Keep your FPDCs a little loose. That extra room lets the yarn cross neatly over the skipped stitch without pulling it too tight and distorting the fabric.
This stitch crosses raised posts of skipped stitches, making a subtle but distinct pattern suitable for many projects.
Working the Following Rows and Pattern Repeat
After completing your slat stitch row, the next row will be a simple double crochet row across all stitches.
- Chain two (or chain one or three to vary the height) and turn your work.
- Work one double crochet in each stitch across the row.
- This row is technically the “wrong side” but keeps your stitch count even for the next slat stitch row.
When you turn again to start your next slat stitch row:
- Chain two and turn.
- Begin with a double crochet in the first stitch.
- Continue with the slat stitch pattern: skip one stitch, front post double crochet around the next stitch, return and front post double crochet around the skipped stitch.
- Work double crochets between each slat stitch group as before.
- Keep track of your stitch counts to stay symmetrical and prevent your edges from skewing.
You might find that some miscounting happens at the start. For example, in the tutorial scarf, the initial chain gave a few extra stitches unintentionally, which meant the edges weren’t quite symmetrical. That’s an easy fix once you plan the chain length in advance.
Use the slat stitch for full-length textures like in a scarf or blanket. You can also add it as a band of texture along the edge or in sections of your project.
Practical Uses and Project Ideas
The slat stitch is great for many projects. It adds depth and visual appeal with minimal effort.
- Blankets: Add it across whole blankets or as a featured panel. The texture adds warmth and interest.
- Scarves: Make your scarves pop by sprinkling slat stitches throughout, or work the entire scarf in this stitch for a textured look.
- Sweaters and garments: Use it as textured stripes or accents along cuffs, collars, or yoke sections.
- Tapestry crochet: The stitch pairs nicely with colorwork techniques like tapestry crochet to give interruptions in your color fields a touch of dimension.
It’s a versatile stitch that lets you add personality without complicated counting or tricky increases.
** Some of the links in this post may include affiliate links. Purchasing from one of these links pays me a small referral fee at no added cost to you. These small fees add up and help me keep the blog running. View our Disclosure and Privacy Policy for more information.
Additional Resources and Community Engagement
This stitch is part of a broader community crochet challenge called the “From Us to You” crochet donation challenge. You can find full details in the video description and join for free patterns, including July 2025’s selection with maker Helen from Sunflower Cottage Crochet.
For more free patterns and tutorials, visit Sandra’s blog at Sand Stitches Free Patterns or browse her designs on Ravelry. There’s also a dedicated Facebook group with monthly challenges and live sessions where you can connect with fellow crocheters: Sand Stitches Facebook Group.
To get projects organized, Sandra offers project trackers and newsletters to help keep your stitches in line. You can join the mailing list and get a free row tracker to follow your progress.
If you try this stitch, share your photos and experiences in the comments or within the community groups, and don’t forget to subscribe to the YouTube channel for more crochet tips.
Crochet Terminology and Techniques Recap
Let’s quickly review the basics used in this stitch.
- Double Crochet (dc):
- Yarn over, insert hook into stitch.
- Yarn over, pull up a loop (3 loops on hook).
- Yarn over, pull through 2 loops (2 loops left).
- Yarn over, pull through final 2 loops.
- Front Post Double Crochet (FPDC): Instead of working into the top loops of a stitch, you yarn over and insert your hook from front to back around the post of the stitch below. This raises the stitch above the row and creates texture.
- Crossed FPDC in Slat Stitch: By skipping a stitch and then working FPDC around the next stitch’s post before returning to that skipped stitch’s post, you create a crossed effect that forms the “slat.”
This combination of skipped stitches and front post stitches is what makes the slat stitch stand out on blankets and scarves.
Try this stitch in your next project to add texture and character effortlessly. It’s an easy way to make your crochet work stand apart while staying quick and fun.
Keep calm and crochet on!
Questions?
Ask and share in our
FREE Facebook Group
DISCLOSURE
AMAZON ASSOCIATES: Sandra Stitches is a participant in the Amazon Services LLC Associates Program, an affiliate advertising program designed to provide a means for sites to earn advertising fees by advertising and linking to Amazon.com.
This post contains links to products that I use and recommend, If you purchase any using my links I get a very small fee at no ad to you! Thank you for supporting my small biz!

