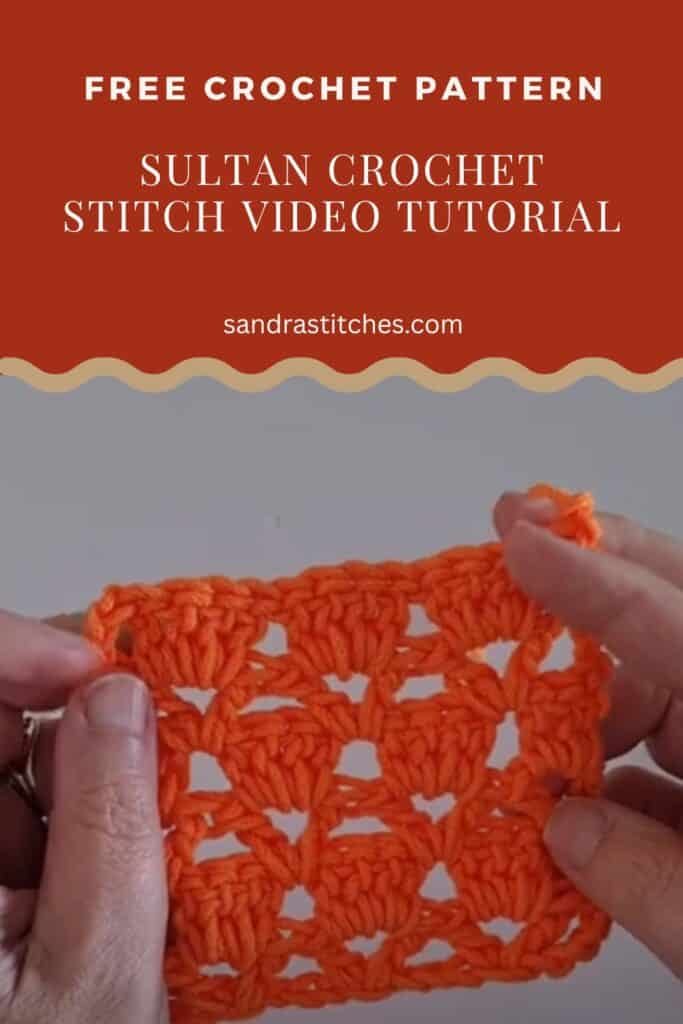
This is a Complete Guide to Mastering the Sultan Stitch
Looking for a stitch that’s both beautiful and beginner-friendly? The Sultan Stitch might be your new favorite.
This one is light, lacy, and adds a touch of elegance to just about any project, whether you’re working on a shawl, scarf, or a fancy little accent piece.
It uses basic stitches in a clever way to create a delicate openwork look, and once you get the rhythm, it’s such a joy to work up
Here’s the video tutorial to watch along as you crochet:
What Is the Sultan Stitch?
Definition and Basic Characteristics
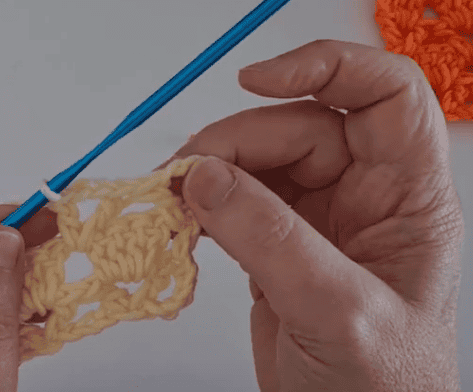
The Sultan Stitch is a gorgeous lacy design made with clusters of double crochets, chain spaces, and V stitches. It looks more complex than it is—always a win in my book! What you end up with is a soft, airy fabric with just the right amount of detail. It’s ideal when you want something light and elegant without being too solid or heavy.
Origins and Modern Appeal
We don’t know exactly where this stitch originated (one of crochet’s many mysteries!), but it’s been popping up all over Instagram, Pinterest, and design blogs lately. It’s easy to see why crocheters love using it for light wraps, breezy scarves, or even decorative panels.
It’s got that “how did you make this?!” kind of look, but it’s totally doable, even for newer crocheters.

Essential Materials and Tools
Recommended Yarn Types
This stitch works best with light to medium weight yarn, Yarn Weight 4 is a great place to start. You can use cotton for a crisp, defined texture or go with acrylic for something a little softer. Blends work too, depending on the feel you’re going for.
Favorite Crochet Hooks
Grab a 5mm crochet hook for this stitch (or whatever size gives you a fabric you love).
Tension matters here, onsistent stitches will make your project look clean and polished. If your stitches feel too tight or loose, try sizing up or down until it feels just right in your hands.
Additional Supplies
Keep some stitch markers handy for tracking repeats (especially helpful on bigger pieces). You’ll also need scissors and a tapestry needle for weaving in your ends. Not much else, just you, your yarn, and your happy stitching time.vely instead of stacked directly above each other.
The form you have selected does not exist.
Step-by-Step Guide to Crocheting the Sultan Stitch
Setting Up Your Foundation Chain
Start with a slip knot and chain a multiple of 4 plus 1. For example, chaining 17 (4×4 + 1) gives you a nice small swatch to practice. This foundation chain is important—it sets the whole pattern up, so take your time getting it just right.
Row 1: The Base Row
Start in the 6th chain from your hook. Work a double crochet, chain 2, and another double crochet into that same chain (that’s your first V stitch). Skip 3 chains, then make another V stitch in the next one. Keep going like this across the row. When you reach the end, skip the last two chains and finish with one double crochet. Nice and neat.
Rows 2 to 5: Building the Pattern
Row 2: Chain 3, turn. In each chain-2 space from the previous row’s V stitch, work 4 double crochets. End the row with a double crochet in the last stitch.
Row 3: Chain 4, turn. Work your first double crochet between the edge and the first cluster. Then, V stitches go between each cluster—some spots will need one chain between DCs, others might use two depending on placement. Finish with a V stitch at the end.
Row 4: Chain 3, turn. Work 2 DCs at the beginning, then 4 DCs into every chain-2 space just like Row 2, and finish with 2 DCs at the end. This row adds structure while keeping it airy.
Row 5: Chain 3, turn. Work V stitches into the chain-2 spaces again, just like in Row 1. This finishes the repeat and gets you ready to go back to Row 2.
Continuing Your Pattern
Keep repeating Rows 2 through 5 for as long as you want. Whether you’re making a wrap, scarf, or long panel, this pattern grows beautifully. Just remember—tension is everything for keeping your stitches even and your lace looking crisp.
Tips for Perfecting the Sultan Stitch
- Keep your tension nice and even—this will really help the pattern shine.
- Stitch markers are your friends, especially on wide projects.
- If your fabric feels too loose or too tight, try a different hook size.
- And hey—don’t stress if it doesn’t look perfect right away. The more you practice, the better it’ll get!
Creative Uses and Project Ideas
The Sultan Stitch is a gorgeous stitch for lightweight scarves, summer shawls, or even decorative curtains.
Because it’s so lacy, it’s not great for blankets unless you want a super open design.
You can also play with color changes, add borders, or combine it with other stitches for something totally unique.
Expert Tips and Adjustments
Want to make your project look a bit different? You can adjust the stitch count, tighten or loosen the chain spaces, or even add more double crochets to the clusters. Try using a thinner yarn for an ultra-delicate look, or stick with worsted weight for something a little more cozy.
As always, consistent tension makes all the difference, especially on larger projects where spacing can get tricky.
Conclusion
The Sultan Stitch has that perfect mix of simple and stunning.
With just a few basic stitches, you can create something that looks fancy but is actually really doable.
Once you get the rhythm, it’s super relaxing and so satisfying to watch it grow. Give it a try, and don’t be afraid to make it your own.
Happy crocheting!
If you want to join a community that learns new stitches and shares projects, consider joining the V-Stitch Club for exclusive patterns and tutorials.
Want to save this post for later? Go ahead and PIN IT!
Additional Resources from SandraStitches
Sandra offers various tools and groups to help with your crochet projects:
- Join her free Facebook group for monthly challenges, live tutorials, and free patterns: Sandra’s Crochet Facebook Group
- Subscribe to her newsletter to get a handy free row tracker, perfect for keeping stitch counts straight: Free Row Tracker
- Consider the crochet project tracker from Amazon to stay organized: Crochet Project Tracker
- Keep up with her latest stitch tutorials by subscribing to the SandraStitches YouTube channel
The Sultan Stitch is a fun pattern to add to your stitching toolbox.
Click here to share your finished project with our community!
A new stitch step
- When learning a new stitch, try several yarn weights and hook sizes to understand how the stitch works and looks.
- Use light yarn colors to get the stitch to form the right shape.
- Make several swatches before starting a new project
Stay Calm and Crochet!😎
Sandra
Interested in a professional Paperback Crochet Planner?
DISCLOSURE
AMAZON ASSOCIATES: Sandra Stitches is a participant in the Amazon Services LLC Associates Program, an affiliate advertising program designed to provide a means for sites to earn advertising fees by advertising and linking to Amazon.com.
This post contains links to products that I use and recommend, If you purchase any using my links I get a very small fee at no ad to you! Thank you for supporting my small biz!