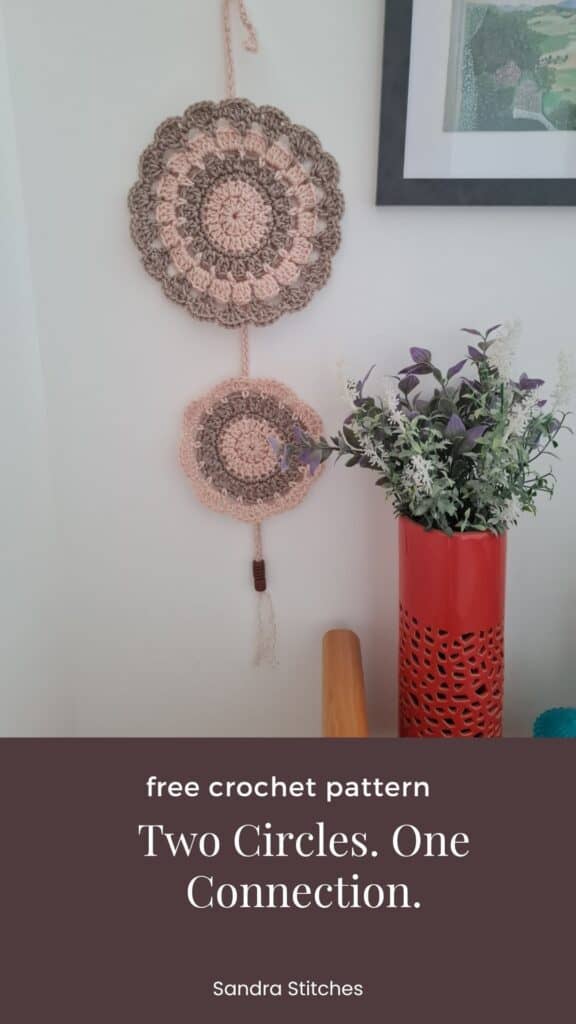
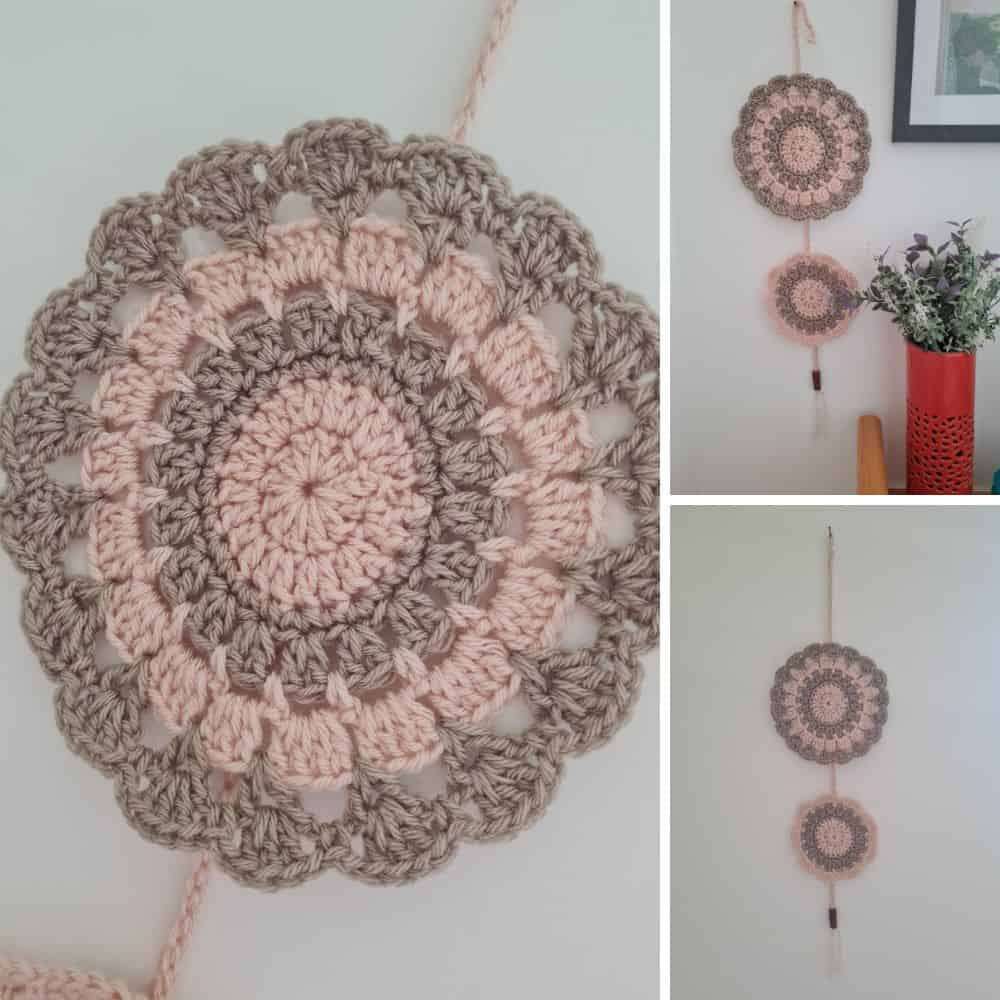
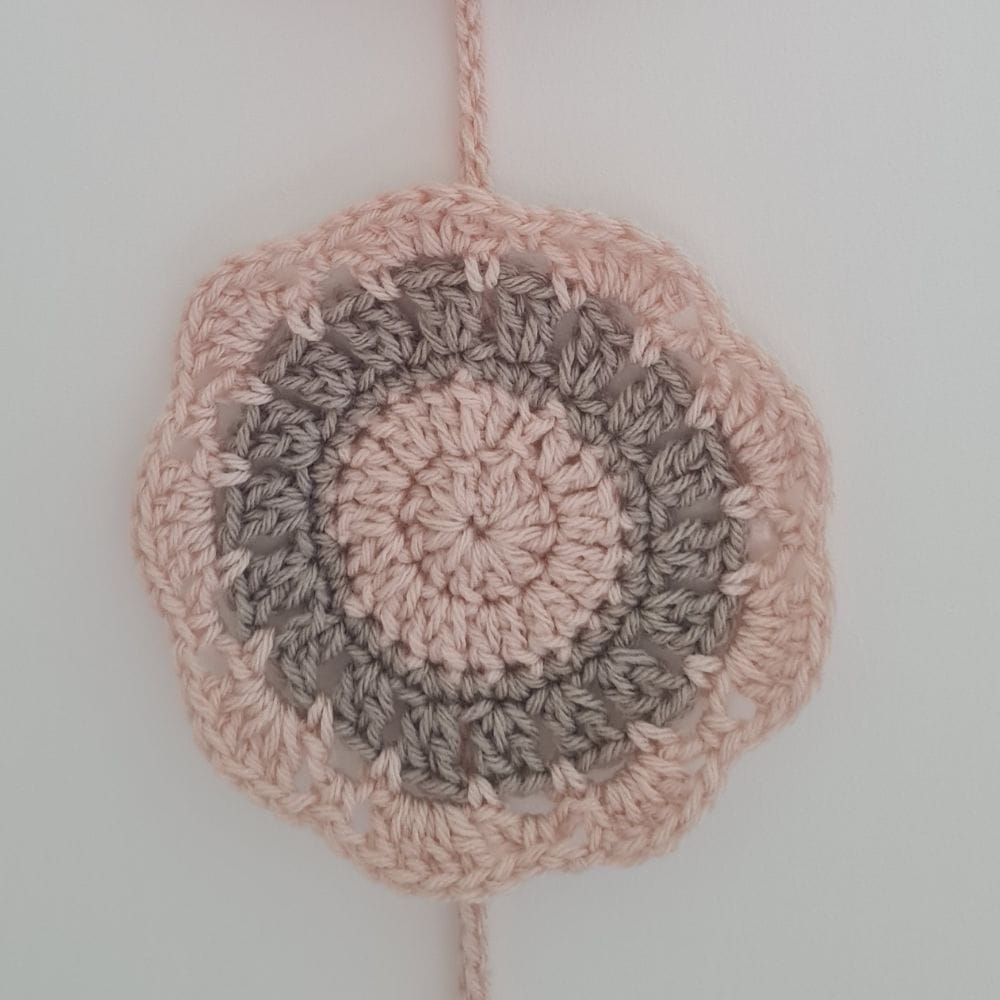
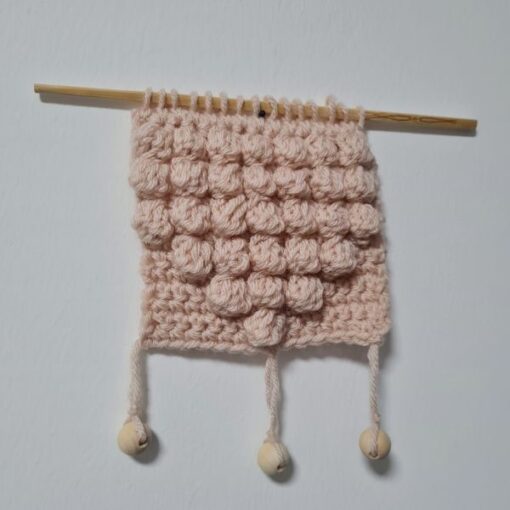
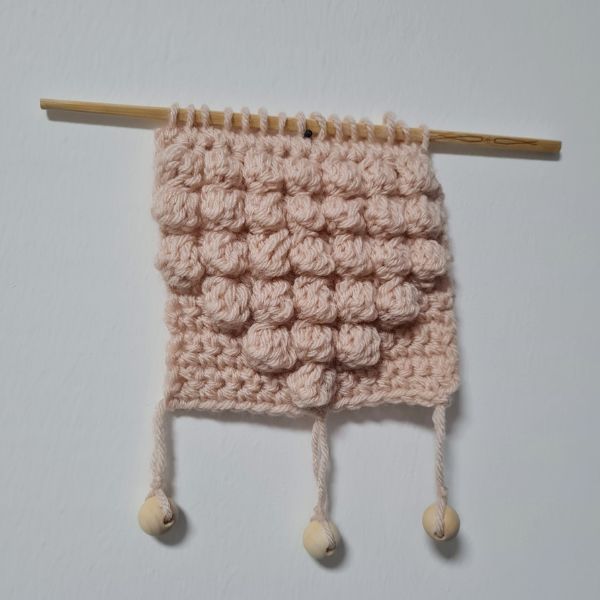
Some projects just have a little heart in them, and this one definitely does. The Sister Circles Wall Hanging is made up of two crochet circles (almost like quiet little mandalas) joined one under the other, with a tassel and a few beads to finish it off.
It’s simple, soothing, and looks beautiful wherever you hang it.
This design is one of those “crochet it once and you’ll want to make another” kinds of patterns, the perfect mix of relaxing rounds and instant satisfaction. It’s light, airy, and just a little bit boho without trying too hard.
Are you with me?
How to Get the Ad-free PDF of this Design
The pattern instructions are available below, but you can get the formatted, printable, ad-free PDF for just a few dollars in our shop and support my business, thank you!!!
2025 Giftstravaganza Blog Hop
The Sister Circles Wall Hanging Pattern is featured in the 2025 Giftstravaganza Blog Hop with Underground Crafter
The blog hop will run from November 1st to 30th, and each day, a different designer will release a new crochet pattern that is perfect for the handmade holiday gifts made with 1, 2, or 3 skeins of yarn! Each pattern is forever free on a blog, but you can also grab the PDF version of the daily featured pattern free for 24 hours!
Each week will have a different theme:
- Week 1 – Nov 1st-7th – Gifts for Home
- Week 2 – Nov 8th-14th – Gifts for Women
- Week 3 – Nov 15th-21st – Gifts for Babies, Kids, and Teens
- Week 4 – Nov 22nd-28th – Gifts for Anyone
- Week 5 – Nov 29th-30th – Last-Minute Gifts (can be made in an evening or afternoon)
How To Join the 2025 Giftstravaganza Blog Hop
- You can join in by crocheting the projects as you have time.
- Share your progress and post pictures of your finished projects. Tag your projects and posts #giftstravaganzacal on all social media.
- If you’d like to chat with other crafters, join the Underground Crafters Facebook group
- By the end of the blog hop, you’ll have up to 30 awesome gifts for the handmade holiday season while having fun with us!
Visit the main blog hop page on Underground Crafter HERE to join the hop and learn all about the amazing, weekly giveaway prizes!
Look below for the Free PDF direct download image 👇
No time to make it Today? Save to Pinterest!
Click your favorite image, below, and save to your Pinterest board or share with friends
The Story Behind Sister Circles
This idea started one quiet afternoon when I was crocheting without a plan really, just letting my hook wander. I had a few yarn scraps and ended up with two circles that felt… connected somehow.
So I joined them, added a tassel, and realized they looked like sisters, different in size, but part of the same story.
That’s how Sister Circles got its name. It’s a simple piece that feels balanced and calm, like two voices in harmony. You can see it as a symbol of connection, friendship, or just a pretty piece of wall art, it carries a little meaning in every round.
** Some of the links in this post may include affiliate links. Purchasing from one of these links pays me a small referral fee at no added cost to you. These small fees add up and help me keep the blog running. View our Disclosure and Privacy Policy for more information.
A Perfect Way to Use Up Leftover Yarn
You know that little pile of yarn leftovers we all keep “just in case”? This is their moment to shine. Sister Circles works beautifully in two shades of the same color, or you can go bold and make each circle a different hue. Neutrals give it a calm, modern look, brights make it playful and full of personality.
If you have yarn with a bit of shimmer or texture, even better. Hang it somewhere the light can catch it, the beads will sparkle a little, and that tassel will dance with every breeze.
Before you get started, check out my newest favorite finds!
Yarn Winder – a perfect crochet accessory
Steamer for Clothes – Portable ideal for crochet projects
Blocking Mat – 12.5″ for all your squares
Make It Your Own
There’s no one right way to display Sister Circles. Hang it near your craft corner, by your entryway, or even as part of a little handmade gallery wall. It fits anywhere that could use a touch of cozy creativity.
It’s also a lovely gift idea, quick to make but full of intention. Giving it to a friend, sister, or someone who appreciates handmade art, it’s one of those pieces that feels personal.
Free PDF Download is valid for 24 hrs November 24th

Let’s get to the pattern, shall we? Making the Sister Circles Mandala Wall hanging
Difficulty
Easy
Materials
- I used Acrylic yarn- you can use cotton yarn
- Yarn: 100% Acrylic, weight #3 yarn, approx 45 grams in 2 colors ( Light Pinky (A), Beige (B)
- Hook: US Size (4 mm)
- You can use any yarn of your choice and in any colors
- Optional: Wooden dowel or branch for hanging, beads or tassels for embellishment
Yarn Needle, Scissors, Measuring Tape
Gauge
- not relevant
Finished Size
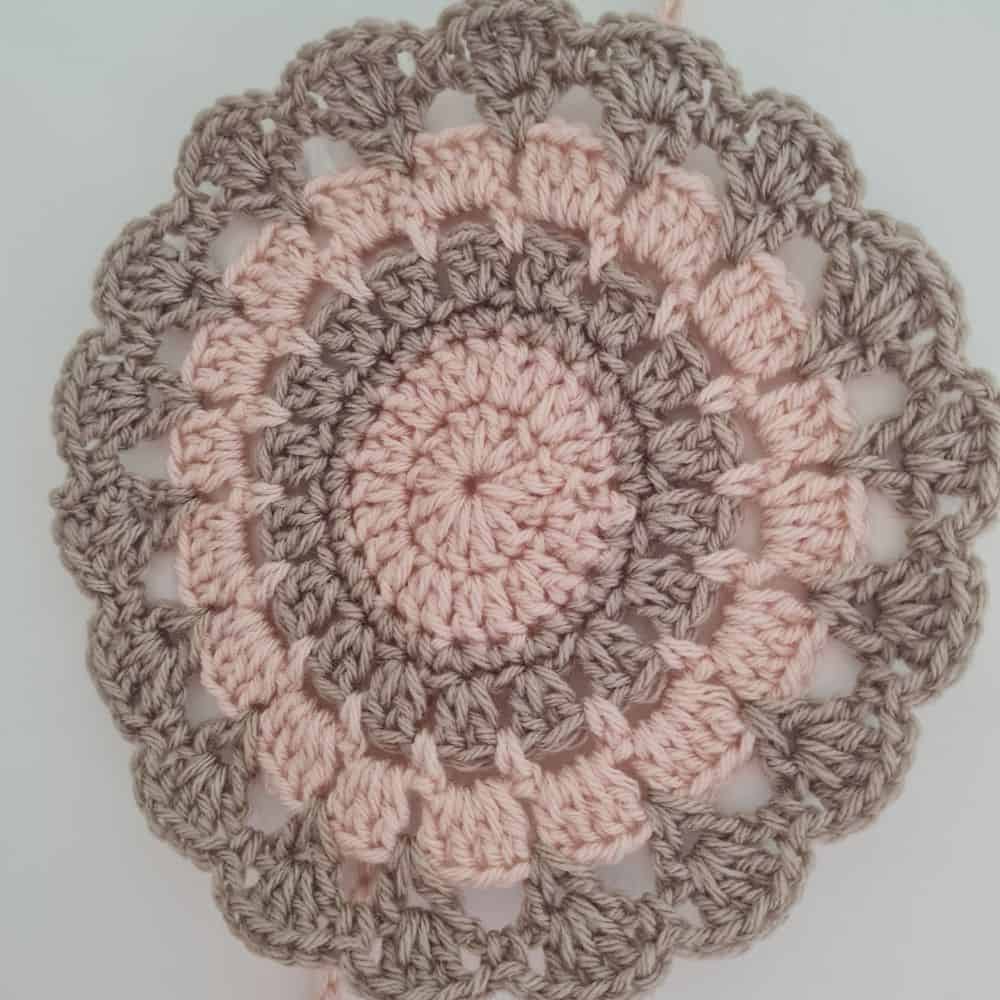
The bigger mandala sample is 9” wide before blocking
The smaller mandala is 6.5” wide before blocking
Stitch Key
- Ch = Chain
- St = Stitch
- Sc = Single Crochet
- Dc = Double Crochet
- Slst = Slip stitch
Notes
- This pattern is written in US terminology
- This pattern is worked in rounds
- Ch 3 does count as st at the beginning of each row
- Ch1 at the beginning of the row does not count as a stitch
- This pattern uses pattern repeats.
- Each mandala is crocheted in joined rounds. The large mandala includes more detailed rounds, while the small mandala follows a simplified version. Both are made separately and assembled afterward.
- The mandalas are worked in two colors (Color A and Color B), alternating every two rounds for a soft striped look. You can choose contrasting or tonal colors depending on the desired aesthetic.
- You can scale the size by using thicker or thinner yarn and an appropriate hook.
- Add fringe, tassels, or beads for extra flair.
Love This Pattern? There’s More Where That Came From!
You will discover my complete collection of crochet patterns,
tutorials, and resources, both free and premium, all in one convenient place.
I know you’ll find something to inspire your next project🙃
Instructions
Large Mandala
Round 1 (Color A – Pink)
Start with a magic ring or ch 4 and sl st to the first ch to form a ring. Ch 3 (counts as dc), work 11 dc into the ring, join with a sl st to the top of ch 3.
[12 dc]
Round 2 (Color A – Pink)
Ch 3 (counts as dc), dc in same st, dc 2 dc in each st around, Join with a sl st to the top of ch 3.
[24 dc]
Round 3 (Color B – Beige)
Fasten off. Join Color B in any st.
2 sc in first st, 1 sc in next st – repeat around. Join with a sl st to first sc.
[36 sc]
Round 4 (Color B – Beige)
Ch 3 (counts as dc), dc in same st, ch 1, skip 1 st. (2 dc in next st, ch 1, skip 1 st), Repeat around. Join with a sl st to top of ch 3.
[18 dc clusters, 18 ch-1 spaces]
Round 5 (Color A – Pink)
Fasten off. Join Color A in any ch-1 space. Sc in ch-1 space, ch 3 – repeat around, join with sl st to first sc.
[18 ch-3 spaces, 18 sc]
Round 6 (Color A – Pink)
Sl st into first ch-3 space. Ch 3 (counts as dc), 3 dc in same space. Ch 1, 4 dc in next ch-3 space – repeat around. Join with sl st to top of ch 3.
[18 shells, 18 ch-1 spaces]
Round 7 (Color B – Beige)
Fasten off. Join Color B in any ch-1 space. Ch 4 (counts as dc + ch 1), dc in same space (V-stitch). Ch 2, V-stitch in next ch-1 space – repeat around. Join with Slst to 3rd ch of starting ch 4.
[18 V-stitches, 18 ch-2 spaces]
Round 8 (Color B – Beige)
Sl st into ch-1 space of first V-stitch. Work (3 dc) in V-stitch, ch 1, sc in next ch-2 space, ch 1 – repeat around. Join with sl st to first dc.
[18 shells of 3 dc, 18 sc, all separated by ch-1]
Small Mandala
Round 1 (Color A – Pink)
Start with a magic ring or ch 4 and sl st to the first ch to form a ring. Ch 3 (counts as dc), work 11 dc into the ring, join with a sl st to the top of ch 3.
[12 dc]
Round 2 (Color A – Pink)
Ch 3 (counts as dc), dc in same st, dc 2 dc in each st around, Join with a sl st to the top of ch 3.
[24 dc]
Round 3 (Color B – Beige)
Fasten off. Join Color B in any st.
2 sc in first st, 1 sc in next st – repeat around. Join with a sl st to first sc.
[36 sc]
Round 4 (Color B – Beige)
Ch 3 (counts as dc), dc in same st, ch 1, skip 1 st. (2 dc in next st, ch 1, skip 1 st), Repeat around. Join with a sl st to top of ch 3.
[18 dc clusters, 18 ch-1 spaces]
Round 5 (Color A – Pink)
Fasten off. Join Color A in any ch-1 space. Sc in ch-1 space, ch 3 – repeat around, join with sl st to first sc.
[18 ch-3 spaces, 18 sc]
Round 6 final round (Color A – Pink)
Slst to ch space, work (4 dc) in ch-3 space, ch 1, sc in next ch-3 space, ch 1 – repeat around.
Join with sl st to first dc.
[9 shells, 9 sc, all separated by ch-1 spaces]
Finishing
Secure the yarn, weave in the ends, and cut the yarn. Block the Mandala using water or a steaming tool.
Joining the Circles and Adding the Hanging Loop
Once both circles are finished, it’s time to turn them into a wall hanging.
Start by chaining the length you want for the hanging cord. This will decide how far apart your circles will hang. When you’re happy with the spacing, use your tapestry needle to sew the top of the lower circle to the bottom of the upper one.
With the same needle, thread and attach your beads right below the bottom circle (or wherever you like them best). Make sure to tie a small knot after the last bead so they stay securely in place.
To finish, go back to the top of your chain and slip stitch into the fourth chain from your hook to form a small loop for hanging.
And that’s it! your Sister Circles wall hanging is ready to find its spot on the wall!
A few common questions crocheters ask and that Sister Circles naturally answers:
Q: How do I crochet a simple wall hanging with circles?
This pattern shows you how two mandala-style circles stacked vertically, joined together, and finished with a tassel and beads for a handmade touch.
Q: Is Sister Circles beginner-friendly?
Yes! If you know how to crochet in the round, you can make this. It’s relaxing, forgiving, and perfect for an afternoon project.
Q: What yarn works best?
I love cotton yarn for this one, it holds its shape nicely, but you can use any medium-weight yarn that feels good in your hands.
Q: How do I attach the beads and tassel?
You’ll find an easy method in the pattern☝️No special tools needed, just a few quick steps that add a polished, boho-style finish.
Q: What are some other easy crochet wall decor ideas?
If you enjoyed Sister Circles, you’ll love my other mandala and wall hanging patterns , each designed to bring a bit of handmade calm and color to your home.
**This is an original Sandra Regev pattern: Owner /Designer of Sandra Stitches. This pattern may not be redistributed for free, sale, or trade, but finished products can be sold with credit to this shop – enjoy!
Looking for more crochet home decor patterns👇
Did you try this Pattern? Share a picture
Tag me on Instagram
@sandrastitchesil
You’ve Got Your Pattern, Now What?
- PIN FOR LATER – Don’t lose this pattern. Save it to your Pinterest account so you can quickly come back to it later.
- SHARE YOUR WORK – Share your in-progress and finished projects on Facebook or Instagram and use the hashtag #sandrastitchesil
- SHOW OFF – Create a project on Ravelry to inspire and share your thoughts with others who might be interested in this project.
Questions?
Ask and share in our
FREE Facebook Group
DISCLOSURE
AMAZON ASSOCIATES: Sandra Stitches is a participant in the Amazon Services LLC Associates Program, an affiliate advertising program designed to provide a means for sites to earn advertising fees by advertising and linking to Amazon.com.
This post contains links to products that I use and recommend. If you purchase any using my links, I get a very small fee at no ad to you! Thank you for supporting my small biz!

